
Dynon’s STC’d version of the SkyView HDX system was introduced a couple of years ago (we covered it in the September 2017 Aviation Consumer), but it hasn’t been retrofitted in large numbers. Part of that is because the STC has been limited to Cessna Skyhawk models (at press time Dynon earned an STC for some Beech Bonanza models), plus Dynon hasn’t established a large installation network.
Dynon’s battle for certified dollars got harder this year when Garmin announced the G3X Touch system, which would be the closest competitor to a SkyView HDX and available for almost 500 certified aircraft models.
That’s too bad, because SkyView HDX offers a boggling feature set for the dollar and an installation option that lets you get involved at a level only homebuilders used to experience.
We just completed a basic SkyView install in my Maine-based flying club’s 172, and if you’re considering this major retrofit, this field report is for you. There are lessons.
Should We Do This?
Our club’s flagship 172N got a serious IFR panel upgrade back in 2000 or so. The avionics included an Apollo MX20 MFD, GX60 GPS/Comm and S-TEC autopilot with altitude hold. There was an Insight GEM engine monitor and the airplane also had some serious mods that made it a keeper-STOL kit, 180-HP engine and beefy 182 control yokes.
But the avionics were showing their age. Buttons on the radios and transponder were wearing out from sheer hours of use. Display streaks on the MFD made you think it had been left out in the rain. The GPS database could no longer be updated with all modern approach fixes. The autopilot ready light no longer lit. The engine monitor sort-of told you the EGTs and CHTs if you brought your reading glasses and the sun wasn’t too bright.
It’s a club, so some folks suggested letting things break and making it a VFR-only airplane. Or at most keeping it a round-gauge machine with minimal updates. They were in the minority, however, so in late spring 2017, our club approved an upgrade to dual Garmin G5s, a new GTN650 navigator and GTX345 ADS-B transponder from Garmin. We started raising the roughly $32,000, but postponed the purchase until after Oshkosh-just in case.
Enter Skyview
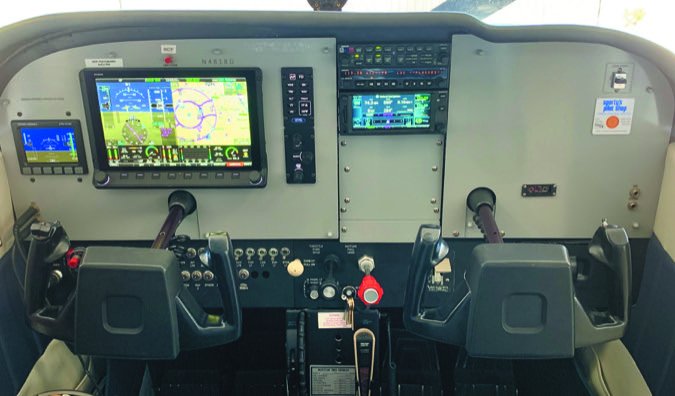
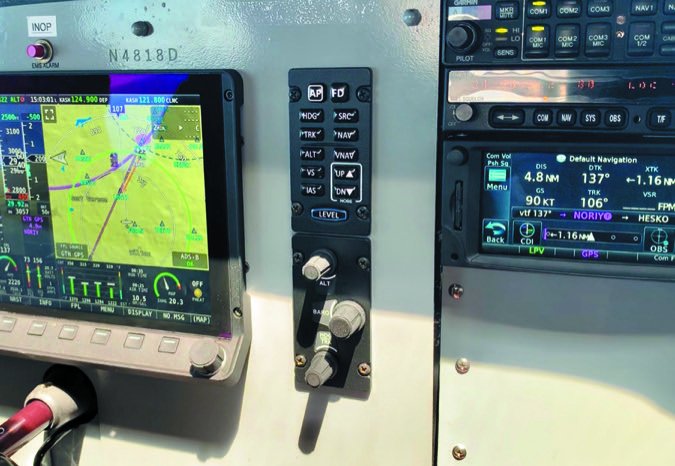
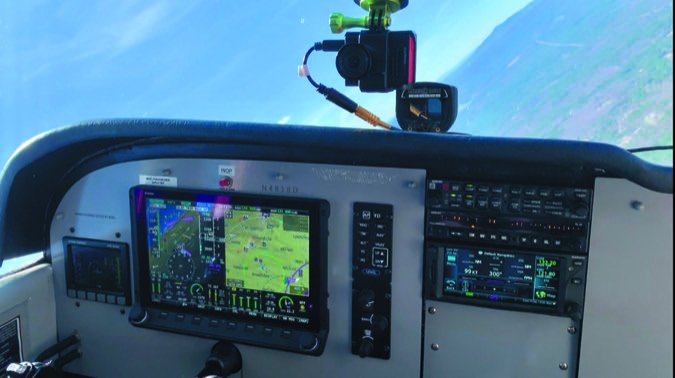
Then Dynon Avionics upset the cart by announcing the SkyView HDX touchscreen system would be available for the Cessna 172. The core install centered around a 10-inch touchscreen with synthetic vision. The screen could be split three ways for PFD, MFD and engine instruments. A second 7-inch screen on the right side was optional. The backup Dynon D10A electronic AI with airspeed and altitude tapes was standard. So was a real two-axis autopilot with approach capability and an emergency “straight-and-level” button.
I got my eyes on the system at AirVenture (I was at the show working with sister publication AVweb) and asked more questions. How about ADS-B In and Out via a 1090ES transponder, so we could fly into Canada (for now) and what about Wi-Fi for connecting to iPads, and backup batteries for those displays? Standard. Full engine monitoring? Yep, that’s included with all the probes and sensors. The total system price was slightly more than we were already going to spend. The SkyView Certified was a no-brainer.
The suggested GPS navigator was an Avidyne IFD540 or 440, but we went with the Garmin GTN650 we chose initially because its simple interface suggested a lower training barrier. In a club with about 60 pilots, that’s a big deal. However, we went for just the one 10-inch screen. This investment was already looking to be enough to spend on an aging Skyhawk.
Schedule Carefully
As Dynon got its certification ducks in a row, we secured a spot with Thrustflight, a Dynon Certified install center in Addison, Texas, for the install. At the time, this was the closest approved shop to our club’s base in Maine. Air Plains Services in Wellington, Kansas, has since been added to list. Still, no problem; we found members interested in the flight time. The plan was to bring it over in October of 2017, and the budget was now $45,000 all told.
That didn’t happen because it took Dynon into spring of 2018 to get STC approval for our Skyhawk. Our peak flying season is in the summer, so we planned to fly the airplane to Texas in the fall of 2018. Thrustflight kept a spot reserved for us. Meanwhile the heading indicator failed, making the airplane VFR only. The transponder failed, and we had to get a used unit.
Then Dynon offered a new way to get the install done: Have your local IA do the job by adding their name to your STC. Our IA had put an older SkyView in a Glastar, so as great as Thrustflight had been up to that point, we switched plans to go local. However, Thrustflight was still happy to answer questions and sell us custom panels, pre-cut for the install we planned. That’s commendable from a shop that just lost a $45,000 job.
Then we lost an airplane in a landing accident (no injuries) and the install had to be pushed to winter of 2018. That meant we had to compete with annuals already scheduled for the same time, which meant the airplane went in and out of the IA’s hangar and sat sometimes for weeks at a time. This is the reality of handing a project of this size to a small shop and you need to expect it take longer than planned, which includes post-installation tweaking and bug-chasing.
It was April of 2019-months after we dropped it off-when we got our airplane out of the shop and ready for its shakedown flights.
Avionics Overhaul, Sans Expert
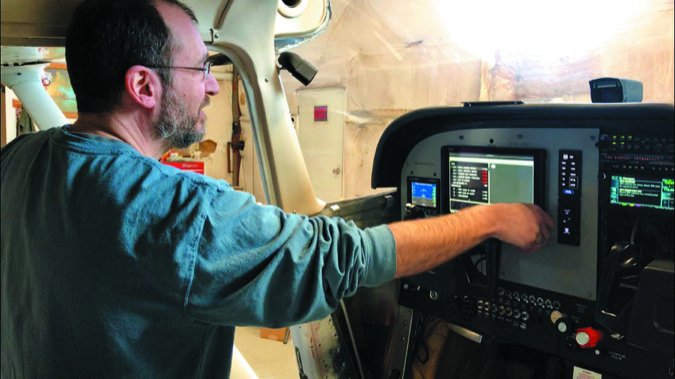
I could regale you with details of the install missteps and near disasters as our IA and our member-helpers figured out as we went. Better that I sum them up as points learned.
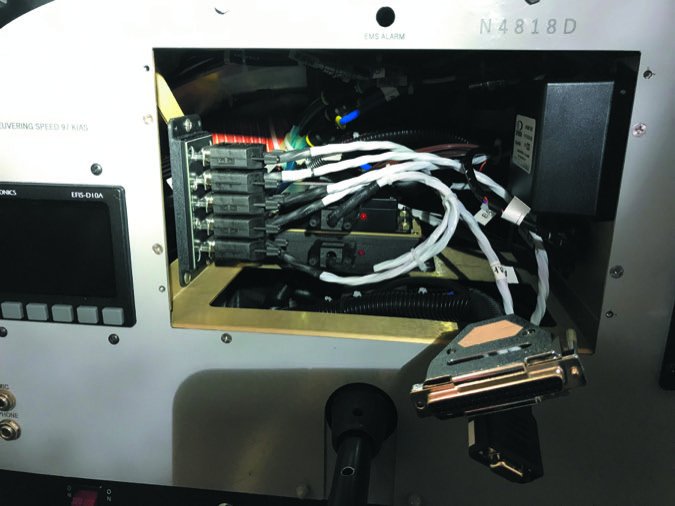
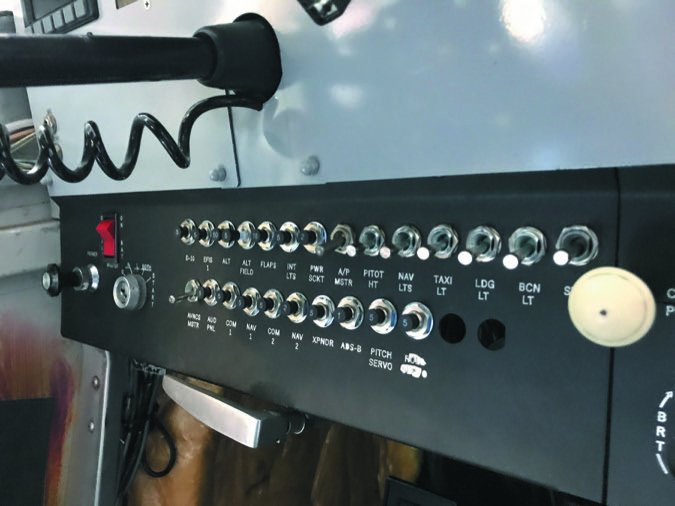
Because virtually the entire panel came out, we took the opportunity and replaced all the lower circuit breakers and many switches at the same time. This was a good call as it let us clean up that section (and rewire the electrical bus), and organize where new breakers and switches from the SkyView system would go. This is an important part of the planning.
For example, the autopilot servos have a switch, but we wanted that left on at all times because the emergency straight-and-level button wouldn’t work with it off. We kept it away from master switches and gave it a red cover for visibility (it’s not yet installed in the photo below).
SkyView’s engine monitoring added items like carb air temp and fuel flow, which we never had before. All these sensors went in before the main panel, as did the new autopilot servos and cables.
Dynon has served homebuilders-read “amateurs”-for years, and their documentation shows it. But there were only a few places where a call or email to their responsive customer service was needed. That said, most technical answers were by folks used to experimentals. Sometimes the answer/advice was incorrect for a certified install. Dynon is still growing up in this respect, and as more models are added to the STC, the challenges will continue. Garmin spent years developing a vast engineering database from all of its STC work. Dynon has some catching up to do.
For now, some creativity was required. Dynon supplied mounts for some of the equipment, and it’s cleverly designed so parts can stack up, attaching to the part below. However, custom mounts had to be made for the magnetometer in the wing and the critical ADAHRS (an old radio rack sufficed for the latter). Both work great now.
Designing our own install also let us put it all together with maintenance in mind, such as making connecting cables just a bit longer than necessary. This paid off during the debug phase.
As will likely be the case for many installs, the Dynon wasn’t the only equipment installed. Our IA could legally put in and sign off on any radio we wanted, but you can only order your own Garmin GTN650 for an experimental aircraft. Certified installs must go through a Garmin installation center. We had bought one for our RV-12 eLSA, planning to do IFR training, so we just used that one for the Cessna-again a bad idea. There’s more than the physical install.
Garmin paperwork is designed for only the illuminati to handle correctly. By the time we got it all straightened out and working, it would have been better to complete the install sans Garmin parts and then bring it to an avionics shop (and Garmin dealer) for those final pieces.
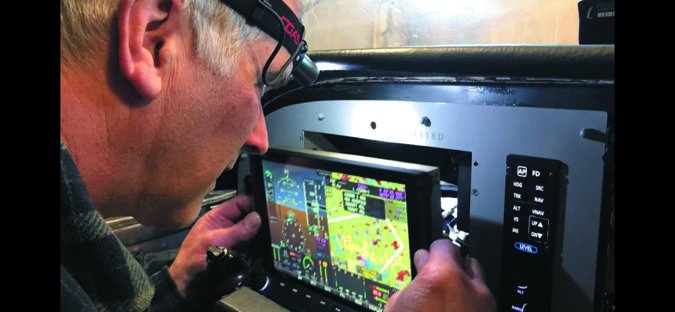
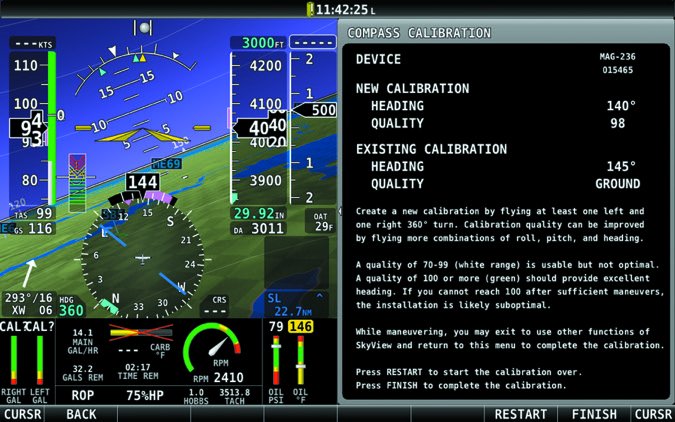
Once the parts were in the plane, the setup was shockingly simple and supremely satisfying. We did our own compass swings, AoA calibration and autopilot tuning. These are critical steps traditionally left to the avionics shop, so don’t try this at home unless you know what you’re doing. The autopilot tuning is a tinker’s dream. Want the AP to bank less in a turn or more? Capture more aggressively? Allow less deviation in turbulence, or more? You can adjust all of that. Much of this is done using on-screen directions that walk you through the process step-by-step. What isn’t is well documented in the installation guide.
To be clear: Our IA had to inspect and sign off on all this work, but we’ve been partners throughout this project. Sort of like the owner-assisted annual from Hell.
We also created an engine instrument layout that worked well for a wide range of experience levels and mirrored much of how it displayed in our RV. Because we do a lot of training, we customized the bigger engine instrumentation layout to better serve students learning what all that data means.
Not to say we didn’t run into problems. Certain sensors and items got configured wrong at the start and it took backtracking to find the issues. A few of the multitude of wires didn’t get connected until the lack of function was discovered in flight testing. The squawk list grew.
Somewhere a decision was made to keep a few older cables for the transponder and nav radios as they were working fine. Do not do this. They all got replaced later. Likewise, the system failed its pitot-static certification because the old tubing had tiny cracks that the analog system didn’t mind, but made the SkyView’s brain see red. Replace every old cable and tube while everything is still apart.
There were also a few items we wanted to connect, but couldn’t. Unlike the Garmin G3X Touch system, the Dynon backup AI in the certified install can’t be connected to the GTN navigator. Nor can it connect to a magnetometer or GPS, so it has no heading or ground track on it. We’re admittedly tempted to connect some of these on the grounds of safety, but we haven’t yet (don’t tell anyone).
Skyview in The Real World
Because we have an RV-12 with a non-touchscreen SkyView, many pilots knew the basics. This meant our checkout process was just ground orientation for pilots already checked out in the RV and the pre-Dynon 172. Most pilots were comfortable flying it after that hour or so on ground power. That included learning the GTN, which was completely new to all of them. We recommended people take a buddy or club instructor on a first flight. We also required a fight with an instructor before anyone exercised IFR privileges in the airplane.
The touchscreen HDX is actually easier than the older button-only SkyView because you just touch what you want on screen and get on-screen buttons. In fact, I find it quicker to control the autopilot from the touchscreen than from the dedicated buttons sitting immediately to the right.
At least that’s true in smooth air. With turbulence, the buttons work better, so it’s great to have both. The install also includes dedicated heading, baro, and altitude bug knobs. The HDX has places to brace your fingers, and knobs and buttons for functions you might otherwise do via the touchscreen. It’s similar to Avidyne’s hybrid-touch approach that way and really makes a great combination approach.
We retained the SL30 navcomm from the previous panel. It plays perfectly with the SkyView, even exchanging frequencies and control between the displays. We chose to set up that radio as navcomm number one and make the GTN number two. The SL40 in our RV is the only radio so both planes now have the SL controlled from the SkyView display, which we hope offers some consistency. This essentially gave us two touchscreen-controlled radios; the SL30 from the SkyView and the GTN from its own touchscreen.
We showed pilots how to put a six-pack of instruments up for the round-dial holdouts. Some folk do prefer to fly this way. The SkyView HDX that’s part of the certified install is dirt-simple to use. Even folks who struggled a bit with the classic SkyView in the RV seemed to pick up the HDX user interface right away.
There are a few items on the display that took adjustment. Instrument approaches with vertical guidance require looking in two places on the display. This isn’t a big deal, but a focused view like Garmin offers would be nice. We’re also based on the coast and an approach over the water shows as blue sky over blue ocean. Whoops. Again, there’s a grid to show which is the earth below, but it’s a surprise when you first see it.
Night flight was also a bit of a surprise. The displays are easy enough to read, but the SkyView HDX and D10A (backup AI) don’t dim at the same rate. There’s also no spillover light for other switches the way the old post lights used to offer. We may add some glareshield lights just for more ambient cockpit lighting.
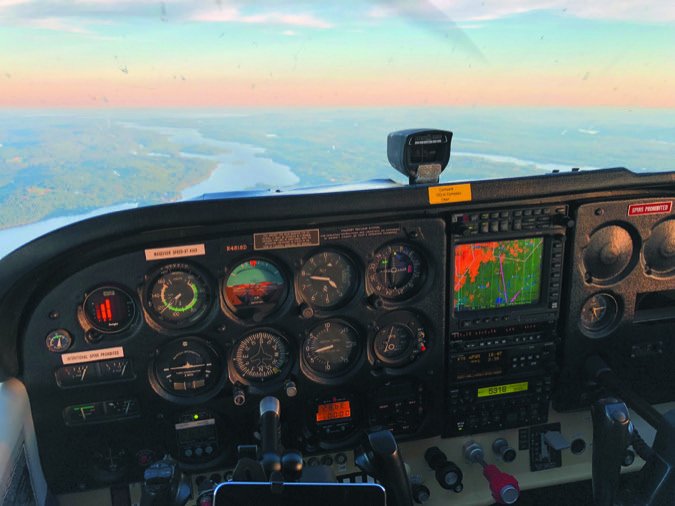
During calibration of our stock (read: ancient) Cessna fuel senders, we had to give up and just edit the voltages for certain gallon amounts to yield a gauge that even remotely worked. The addition of the fuel totalizer was fantastic, however. It’s been accurate to a tenth of a gallon between refuelings.
Dynon has a great feature where it compares what the totalizer thinks is on board to the gauge readings on the ground and alerts you if they don’t match. With so many people using the airplanes and forgetting to tell the computer they added fuel, that’s a big win.
The new system also uncovered a mechanical issue. Our old engine monitor hinted that CHTs were a bit high, but it was hard to tell for sure. SkyView showed CHTs reaching into the low- or mid-400s during climbout. It also showed for the first time that full-power fuel flow was a bit lower than it should be. Now that’s getting addressed by our mechanic and could end up giving us a couple hundred hours more of engine life than we otherwise would have seen.
Hits and Misses
0)]
Now that the bugs are mostly squashed and the member checkouts are mostly done, things are generally working well. The final cost, including the GTN650 and labor from a few expert shops to do the things we didn’t get right the first time, was about $42,000. That doesn’t include the time volunteered by club members.
The takeaway there is the cost of doing it locally was a wash-or more if you include our personal time. The plane came out 35 pounds lighter when we reweighed it.
Display failure on our single-screen system would take out our primary flight instruments, moving map and all engine gauges. The flight instruments are on the backup and the GTN and iPad have a map, but we have no backup for the engine instruments. Make that display failure happen in the clouds and we lose vertical nav for approaches.
Dynon’s user design is also busier than Brand G when you cram it all in one 10-inch display. If you have the budget, get two screens. If you really have the budget, get two ADAHRS as well. The GTN sends flight plan information to the SkyView, no problem, but won’t accept it from the SkyView. The iPad can send a flight plan to the SkyView, but that can’t continue to the GTN. Sure, we could buy a Flight Stream 510 for the GTN, but don’t you think we’ve spent enough already? If you go Avidyne, everything plays together.
GPS location and the ADAHRS data flow to the iPad, but weather and traffic don’t, which was a disappointing discovery. We didn’t read the fine print on that. We’re told that should be updated in the next SkyView software update.
About halfway through our install, Garmin announced the G3X touch was now available for almost every sub-6000-pound airplane known to man. Would we have gone that route if we had the option?
I’ll admit I like the Garmin equipment better. The only big oversight I see on the G3X system is the lack of battery backup, but that can be added aftermarket. I would miss the extensive customization that’s simple with the SkyView. Customizing Garmin equipment requires knowing the secret handshake. And maybe wouldn’t even be legal if you did know how to do it.
1)]
However, the same level of capability as we have in our Skyhawk would be at least $5000 more in hardware alone going the full Garmin route. My gut feeling is it would be an additional $5000 delta in labor, but that would depend on your deal with your shop. Is a Garmin system $10,000 better? Personally, I’m not sure-but I am sure our club as a whole would say, “No.” At least so far.
As for whether the club would say the money was well spent on our Cessna, I think the answer would be mixed. The pilots who’ve flown the plane love it. The pilots who prefer VFR days and round gauges might feel otherwise.
There’s universal agreement the plane looks better on the inside. It’s more impressive to potential members and the family of existing ones. The new install has unleashed a backlog of pilots looking to add an instrument rating, which is good for those pilots and the club.
So you could say the Dynon Certified SkyView install has at least a little something for everyone.


