Technicians hate dealing with the required FAR pitot-static and altimeter tests as much as aircraft owners hate paying for them. And that means the potential for system neglect and ultimate failure of otherwise reliable solid-state instruments.
But you can make the dreaded biennial trip to the avionics shop for the IFR inspection more manageable by recognizing some subtle hints that will flunk the test and potentially leave you flying partial panel.
REGULATIONS SAY
From an aircraft upkeep standpoint, FAR 91.411 can be somewhat misleading because it’s a requirement for IFR—not VFR—flying. In summary, it says you can’t operate in controlled airspace under IFR unless within the preceding 24 calendar months each automatic pressure altitude reporting system (Mode C altitude encoder), each altimeter and each static pressure system has been tested, inspected and found to comply with Appendix E of Part 43 of the chapter. Moreover, FAR Part 91.411 (a)(2) states that any time a static system is opened (aside from the alternate static source) a new inspection must be accomplished. The regulation only requires that a leak check is accomplished.
The problem is that many owners who only operate VFR tend to neglect the systems by not having them inspected per 91.411 criteria, which puts emphasis on the health of each altimeter in the aircraft. It’s FAR 91.413 that addresses the requirement for biennial transponder inspections and certifications, and some owners wrongly assume the shop will check the static system, airspeed indicator(s) and altimeter(s). In aging aircraft where static lines and fittings deteriorate to the point of cracking—and ultimately leaking—the problem can be time-consuming and expensive to fix. Mechanical airspeed indicators, altimeters and VSI instruments can all be sources of system leakage.
The bottom line: Consider having the shop perform the 91.411 checks even if you don’t operate IFR. It will cost more, given the effort that’s involved in removing the altimeter from most non-pressurized aircraft. Worth mentioning is that the pitot-static system feeds important information to the air-data computer in integrated avionics systems and in systems with an AOA indicator. So don’t be surprised if during a glass panel upgrade your shop calls and says there needs to be work done to the system. This extra work and expense isn’t uncommon on aircraft that haven’t seen avionics upgrades in a while, and there are pretty specific requirements.
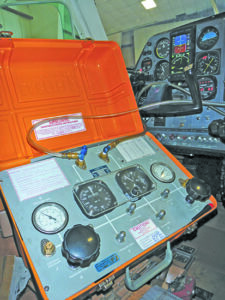
It’s FAR 43 Appendix E that says the altimeter must be checked to make sure there’s no more than 100 feet per minute of case leakage at 18,000 feet. Worth mentioning is that the typical static system in a non-pressurized aircraft will usually leak more than this at 18,000 feet. The shop connects the altimeter to a calibrated master altimeter, and pressure and vacuum is applied as the instrument is run up to its certification altitude and back down. The altimetry in electronic flight instruments isn’t exempt and falls under the same regulatory requirements as mechanical altimeters.
During the test, the technician is looking for meter friction, hysteresis and case leakage, usually taking readings every 1000 feet and noting the discrepancies on the altimeter correction card. If you’ve watched the process, you know it’s tedious and time-consuming to do right. Find a shop that’s skilled in the task—not all are—and has the right equipment for your aircraft.
THE PLUMBING THAT FLUNKS THE TEST
The inspection of the static system, which includes, among other things, a leak check, is what generally fails the test. The troubleshooting effort often snowballs, requiring the removal of the interior components and even major systems, including fuel tank repairs. Fortunately, the static leak repairs can be performed by your local A&P or, better yet, by you, under the supervision of your A&P mechanic, if the proper equipment is available. It’s not rocket science by any means; it’s essentially a plumbing system.
Consider that the average single-engine airplane has around 20 feet or more of plastic lines and static system tubing (some have metal lines, too) that is broken by endless fittings, tees and adapters all designed (in a perfect world) to create an airtight loop, which ties the appropriate equipment to a single ambient static source (or dual ports in the case of IFR aircraft). Think back to the systems portion of your initial ground school training. The purpose of the static system is to provide instrument sensing of a change to outside ambient pressures. It’s crude.
With the exception of an alternate static source, the typical static system has no moving parts. It is simply a loop made from plastic tubes and fittings, designed to be flexible enough to route in the back of instrument panels and through fuselage formers and bulkheads. A water separator is generally installed at some low point in the lines, and in Cessnas, as one example, these condensation sumps are sources of static system leakage because they become brittle and crack from temperature swings or even because someone has overtightened them. These sumps aren’t high-dollar items, but they can require at least some disassembly to access. Experienced techs know to look here first when chasing leakage.
But there are all kinds of reasons for static system leakage. Maybe someone drilled a carpet screw through a plastic line when they were reinstalling an interior side panel. Or someone didn’t provide enough stress relief when they reinstalled a static instrument in a tight panel and now the fitting and attached line are stressed. If you’re installing your own instruments, use caution when tightening the static fittings on the back of the casing. Most cracks occur without the installer even knowing they overtightened the fittings—even if the fittings and lines are new.
Still, leaks seem to occur when and where they want. For this reason, checking the static system yourself, prior to showing up for the testing, could save you money, time and aggravation. Maybe you own an experimental aircraft and do a lot of the work yourself (experimentals aren’t exempt from FAR 91.411 and FAR 91.413 testing). You’ll need to gain access to basic tools—likely available at your repair shop, from tool suppliers or even an auto parts store.

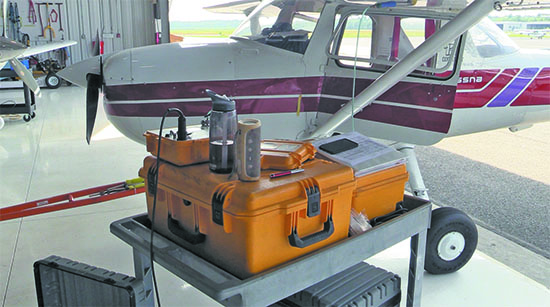
ROLL YOUR OWN LEAK TEST
The core component required for checking for static system leakage is a vacuum pump. To leak-check the static system, it’s necessary to apply enough suction to the static port or some easily accessible point in the loop to simulate an altitude change of 1000 feet. FAR Part 23.1325 and 25.1325 both detail the manner in which the system should be checked and will list the minimum requirements for acceptable performance. The same information is found in AC 43.13-1B, Chapter 12, Section 4. Observe the technician the next time you bring the aircraft in for the test for an idea of how a leak check is done.

There are several ways to tap into the static system for the leak check, but no matter where you apply the suction, you’ll need a device to create a vacuum. Auto repair shops have long used a handheld suction gun to apply a vacuum to diaphragm-operated automatic transmissions. It may be your best choice for simple testing. Some gun kits come with various adapters and cups to allow a single mechanic to bleed the brakes. It’s all about having the right adapters to plumb in.
No matter what you use, the most important feature you’ll need is the ability to seal off the vacuum applied to the system so that a realistic inspection of the system can be made. Remember, your goal isn’t to certify the system, but instead to look for major leaks. And when it comes to the airspeed system, like the static system, the pitot tube and airspeed indicator are connected by various tubes and hoses, many of which are made from the same nylon and plastic hardware as static lines and fittings. Worth mentioning is that FAR Part 43 Appendix E and AC 43.13-1B (Chapter 12, Section 4) do recommend cleaning and pressure testing. Be extremely careful when applying suction to the pitot side of the system or you’ll damage instruments. Leave this to the pros if there’s any doubt of your skills.
Attaching the vacuum pump to the system is easy. Attach a suitable hose to the pump and simply seal the tube to the static source using a lump of putty, sealant or putty-type gasket material. Avoid modeling clay for the potential of system contamination. Once attached, the static system can be sucked down while watching the altimeter and VSI. Remember to plug the other static source for aircraft equipped with a dual source. Work the pump slowly and allow the instruments time to react. Tapping on the altimeter will be necessary to overcome any mechanical resistance. Make sure that you don’t allow any flight instrument the chance to “peg-out” against some maximum, and whatever happens, guard against rapid vacuum loss. If the line pulls out of the putty or your gun should fail, the altimeter will unwind in the blink of an eye and the VSI will automatically reach descent rates unheard of in your airplane.
Once the altimeter reaches 1000 feet AGL, close off the vacuum source and start the one-minute clock. If the altitude remains at or above 900 feet AGL for this check, the system is good to go. If the altitude falls or exceeds the acceptable loss rate, isolation of the leak must take place and the necessary repairs made. We reiterate that any work on certified aircraft (beyond a basic check with no disassembly) needs A&P supervision. Even a casual check can cause damage if not done properly.
THINK LIKE A TECH
If you want to take it to the next step, you can start looking for the source of leakage, but keep in mind it often means lots of disassembly—and knowing where to look first. Many (not all) static system leaks will be found under the panel. For this reason, when a leak is discovered, the first thing you’ll want to do is to pinpoint the general vicinity of the leak. Seal off the static port (or ports) with the putty and tap into a place in the line that will isolate the panel from the rest of the system. This is usually done at a place where the line from the static port meets the first component in the system under the panel. Once the leak is identified in a general way, perform the leak check again and, while a vacuum is applied to the system, gently feel around lines, fittings and unions until a sudden jump in the leak is found. Manipulating the static lines at a weak point will help isolate the offending piece and will identify those areas that could cause a failure in the future.
KEEP IT COVERED
There are some things you can do to keep the pitot-static system in your aircraft operating properly. A good start is covering the pitot tube when the airplane is parked even for short amounts of time. Bugs (especially mud wasps) cause blockages. When washing the aircraft, avoid spraying water near the static ports—especially ones dedicated to autopilots. If you see fogging on some or all of the pitot-static instruments, it could be a hint that there’s moisture in the system.
Last, expect to spend some effort (and money) to keep aging static systems up to high standards; shops tell us they see their fair share of issues. “During IFR certification testing, we run the system up with a Laversab air/data test set to record altitudes. The system must hold altitude at 1000 feet with less than a 100 FPM loss (this is in non-pressurized AC),” TJ Spitzmiller at Sarasota Avionics in Florida told us.
Spitzmiller said most older aircraft have a leak somewhere and the common areas are at the static ports and at the back of the instruments. “If we see that the lines are junk, we always replace what we can get to. Sometimes we have to really dig deep to find a leak and that could mean removing a lot of interior and sucking up a good portion of the day,” he said. But in the glass age, aging static systems are critical and we’re stuck with them. Spitzmiller makes a good point to keep up with inspections, even if you only fly VFR.
“The new glass is using the same system as the mechanical instruments it replaces, so it needs to be robust and we’ll maintained.”