Garmin G3000: Flight Levels Above G1000

For those who lost track of the OEM avionics market for turboprops and light jets, Garmin’s G3000 may seem like a new system, but it was actually unveiled at the NBAA convention way back in 2009. The system isn’t limited to Piper’s M600. You’ll find the G3000 in Daher’s TBM930 turboprop single, in Cessna CJ+ series jets and in the Cirrus Vision Jet, currently undergoing certification. There are more applications coming. Textron announced that the G3000 will be in the front office of the Cessna Denali turboprop single. This raises the question: Is the G3000 the replacement for the aging G1000? Garmin says it is not, but it sure looks to have a sizable presence in the lower end of the Part 23 turbine market, a space that was partially occupied by various versions of the G1000.

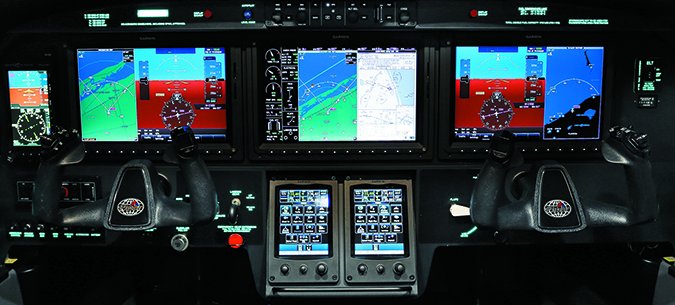
The G3000 was designed out of the gate as a three-screen touch suite (two PFDs and one MFD, with full reversionary backup), presumably answering the call for something a bit more modern for aircraft with multi-million dollar price tags. For certain, the G3000 suite has an unmistakable big-airplane feel, even when its big screens are powered down. Each of those three landscape-configured screens measure 14.1 inches diagonally (with a 16:9 width-to-height ratio), which is considerably larger than the screens in a G1000 suite. Screen resolution, at 1280 by 800 pixels, is notably better than the G1000.

But what really sets the G3000 apart from the G1000 is the user interface. Two icon-driven GTC570 touchscreen controllers, which are mounted just forward of the throttle quadrant (designated as GTC 1 and GTC 2), serve as primary flight management systems and handle nearly all major pilot inputs. The touchscreen uses a grid of infrared beams to determine the location of the touch, even when the operator is wearing gloves. There is no pressing a screen button and waiting for a response. This makes entering data and hopping through menus an efficient chore, the way it has to be in an airplane of this category. The downside, though, is that objects or debris on the touchscreen can interfere with the infrared beams and cause unintended activation of buttons. Still, we found that the controllers worked flawlessly during our M600 flight trial. On-screen buttons are activated by lightly touching them with a finger and then releasing. It is not necessary to apply pressure, as the infrared touchscreen surface detects only the presence and movement of the finger, not pressure. When touched, the button background is highlighted in blue until the finger is released.

Garmin G3000

Better yet, if enabled, an aural “click” sound is also issued to confirm the button has been touched. If a touch input was rejected, you’ll hear an aural “doink”.

If you are even remotely familiar with Garmin’s GTN retrofit navigators, the menu structure of the GTC will be comforting and intuitive. The touchscreen controller’s functions are arranged by screen. For example, each page has a title at the top of the screen area, while the contents of each screen change dynamically in response to pilot or system input. Get lost in a menu when the workload gets high, and the Home screen can be used to bail you out. The Home option is always available in the “button bar” in the lower portion of the screen. The button bar also has a Back and Cancel icon, to return to the previous screen. When a window contains more information than it can currently show, a scroll bar and scroll buttons appear so you can easily get to the rest of it.

Garmin G3000

The touch controllers also have joysticks and knobs, which are context sensitive. The large and small right knobs are used for radio tuning and selection, frequency transfer and data entry. For example, turning the large right knob tunes the selected radio frequency in MHz increments; the small right knob adjusts the frequency in KHz increments, just as you expect it would. Push the small right knob momentarily to change the selected COM radio source (COM 1 or COM 2) for tuning. Push and hold the small right knob for 1.5 seconds to transfer the frequency to the active window. The middle knob is used to increase or decrease the selected audio source volume, as displayed at the top of the screen.

The joystick is turned to increase or decrease map range, or to increase or decrease detail on certain system displays. Pushing the joystick in activates the map pointer for panning across the big screens. Since the M600 is equipped with Garmin’s digital weather radar, the joystick calls up the weather radar controls when the radar pane is active.

Speaking of panes, the touch controllers are integral in selecting and controlling display panes on the PFD and MFD screens, among other configuration chores. For example, GTC 1 controls the outboard display pane location on the pilot’s PFD and the left display pane location on the MFD (when the MFD is in split screen mode). GTC 2 controls the outboard display pane location of the copilot’s PFD and the right display pane area of the MFD. The lower photo to the right shows the pilot’s PFD with the outboard pane active, displaying map data. And yes, that’s an Aspen Evolution PFD for backing up the primary data. A navigation map isn’t the only available pane for split-screen configuration. There is a dedicated pane for charts, datalink weather, traffic and TAWS-B terrain. The system automatically stores various settings and selections within crew profiles. These include a wide range of parameters for both the pilot and copilot including map settings, avionics settings, PFD settings, user waypoints and weight and balance information.

As for data entry (waypoint identifiers and minimum descent altitudes, to name two), you can use the virtual alphanumeric keypad on the touchscreen controller or the knobs. Whether you prefer twisting knobs or fingering the touchscreen, you’ll appreciate not having to reach up to a display to enter data. We sure did, especially in turbulence. There are soft keys at the bottom of each display for making adjustments to the map, turning bits of data on and off and for acknowledging messages. But for the most part, most of your time is spent on the touch controllers—which in the M600, seem perfectly placed.

Garmin G3000

The cabin pressurization system controls and switches are located on the left instrument panel and the pressurization system displays are incorporated into MFD. The only action required by the pilot during normal operation is to input the destination airport elevation by entering a flight plan. You can also access the System page and manually enter the field elevation in the DEST ELV field.

The G3000 has dual Integrated Avionics Units, or IAUs. Each IAU contains a WAAS GPS receiver—GPS 1 and GPS 2. GPS 1 provides information to the pilot’s PFD and GPS 2 provides data to the copilot’s PFD. Internal system checking is performed to ensure both GPS receivers are providing accurate data to the PFDs. In some circumstances, both GPS receivers may be providing accurate data, but one receiver may be providing a better GPS solution than the other receiver. In this case the GPS receiver producing the better solution will be automatically coupled to both PFDs.

As you would expect, the G3000 has Garmin’s SVT synthetic vision, with a 71-degree horizontal view when the PFD is in full-screen mode and 50 degrees when in split mode. The SVT also incorporates TAWS-B terrain data and alerting, shown in red and yellow shading on the PFD. TAWS-B is optional in the M600, since it only has six seats, skating the TAWS mandate.

The G3000 incorporates all engine display data (engine indication system or EIS), plus the CAS (crew alerting system). When a new CAS message is issued, the MSG icon at the top left of the PFD flashes. Press the MSG button on the touchscreen controller to address it. We found the EIS to be intuitive at a glance, with engine data presented using onscreen gauges and digital displays. During normal operating conditions, gauge pointers and display text appear in green. When unsafe operating conditions occur, gauge pointers and the display change color to indicate caution (amber) or warning (red). Perhaps one of the most important, the PT6A’s torque gauge, will change to red and the numerical and text displays flash red if the torque setting exceeds the safe operating range. Get too aggressive with the power lever on takeoff and you’ll know about it.

Finally, as we covered earlier, the Garmin GFC700 flight control system, pictured above, is an integral part of flying the airplane. As in other GFC-equipped airplanes, the system in the M600 has a dedicated control panel, which is located above the MFD and is easily accessible to both pilots.

Plan on substantial studying before going it alone with the G3000. We read the 600-plus page manual before flying the M600 (and have G1000 factory training), but we were grateful to have Piper’s Craig Masters in the right seat to share the workload. As with most airplanes in this category, learning the avionics is a major part of the transition.