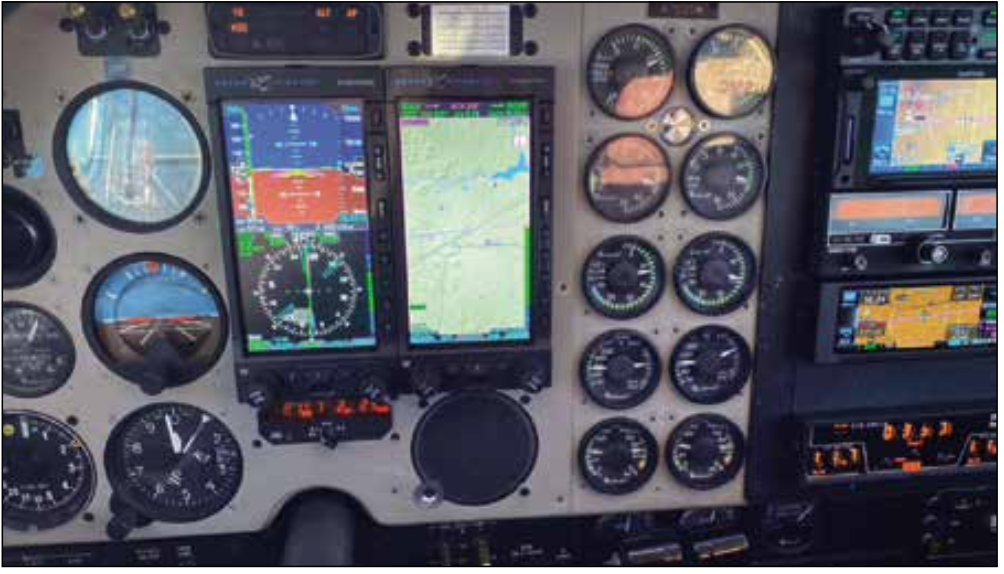
Panel Planner 101: Twin Engine Displays

Think first, cut later. Standalone digital engine gauges for a Beech Baron 58 made for a clean and easier installation than one big screen.

This month’s panel for planning comes from Aviation Consumer contributor Chris Nichols, who has been upgrading a clean Beech Baron. He has some good advice for getting the layout right the first time, and came up with a capable and modern alternative to the analog OEM engine and fuel gauges while retaining the existing basic layout.


The more complex the job, the more likely costs can spiral and downtime can drag on seemingly indefinitely. To help demonstrate, let’s take a look at my experience. Our 1985 Beech Baron 58 (we upgraded from a Bonanza)was mostly equipped as stock, and upgrading to more capable and modern gear made sense. 

The first few months of ownership allowed me to figure out what worked, what didn’t and how updates should be prioritized. Through that, I eventually settled on avionics first, flight instruments next and engine instruments last. As an A&P I knew I could do the engine instruments myself, but I had the local avionics shop do phases one and two since they had the experience to ensure everything integrated properly. Pick and choose your battles. 

I lost track of how many hours I spent researching options for engine instrument upgrades for this twin. I looked at everything available over and over again trying to explore every angle. Fearing the cost of doing so, I desperately wanted to avoid butchering the panel, so that was my focus as I looked through each manufacturer’s offerings. 

COPY AND PASTE

The reviews revealed there was no option that permitted a “drop-in” installation into the Baron’s two-inch round turbine-style gauges. It also led to the revelation that selecting engine instruments would, in part, depend on the choice for an EFIS. I went with dual Aspen Evolution screens—which have no engine display capability.

I made full-size prints of every instrument in the panel to include those that were staying and the potential new ones. I pasted them onto the panel in various configurations until I found combinations that worked we’ll functionally, operationally and aesthetically. I then studied each one in detail and created a chart outlining the pros and cons of the major features and capabilities of each option.

In the end, using standalone digital Aerospace Logic gauges for primary engine instruments and the Insight G4 Twin for engine monitoring functions worked out to be the best overall arrangement, from both the cost and functionality perspectives. It also had the side benefit of providing completely redundant engine instrumentation. A big-screen engine display from JP Instruments or Electronics International would have greatly deviated from the OEM layout, while adding a layer of complexity to the rework. 

The smaller 200-series Aerospace Logic electronic instruments are certified as primary replacements, enabling you to remove the OEM analog gauges as long as the aircraft is on the STC-AML (approved model list), which the Baron 58 is. Every 200-series instrument has the same two-button interface, and the engine instruments have real-time trend graphing, plus external alert outputs. 

For the Baron, I installed dual Aerospace Logic tach/manifold pressure instruments, dual oil temp/pressure instruments and dual fuel flow instruments. The Insight G4 monitor handles the rest. I retained the existing OEM fuel quantity gauges. 

To get there—realizing there was no way to achieve my goals for the panel without reconfiguring it—my attention turned to drawing up an accurate rendering to make sure everything fit properly. A good friend who runs a service center in Boca Raton, Florida, was able to create a Plexiglas template from the drawing and it fit perfectly on the first cut. Once ready for the real panel, the good folks at Superior Aircraft Components in Texas were able to cut, powder coat and mark the new panel and panel frame for a very reasonable cost. In fact, Kranston Kincaid at Superior had the new panel on the way to me within 24 hours of my initial query.  

DECISION-MAKING PROCESS

That’s a look at 1985 OEM wiring and instrument plumbing, top photo, and the Aerospace Logic replacement instruments, below. The Insight G4 engine monitor is a good complement.

The actual installation process was equally vexing. Installation manuals as a rule don’t provide detail-level information for every aspect unless it’s a crucial item or part of the STC. Much of the install is left to the installer, and probably rightfully so due to the near infinite variations amongst the aircraft fleet. Sensor locations, wire runs, circuit breaker locations, brackets, hardware and clamping changes are but a few of the puzzles that must be solved for a successful installation. These are issues that get figured out as the modification progresses.

In the course of these exercises, I came away with a list of key items to factor into the decision-making process. I don’t claim it to be definitive, but it should help anyone contemplating such an undertaking.

• Define the mission. What is the goal to be achieved? Is there a practical motive driving the change or is it more about just wanting new eye candy to look at on the next trips?

In the case of the Baron, the goal was to modernize the instrumentation for the least cost. The existing instruments were mostly original and were surprisingly inaccurate.  Repair/refurbishment was absurdly expensive (especially the sensors).  For example, the oil pressure sensor is originally made by VDO, an automotive supplier, and is essentially the identical $25 part that Volkswagens of the day would use. By the time it goes through Aerosonic (the instrument manufacturer) and Beechcraft, that same $25 part balloons to about $3300. For us, the best option was to replace everything and take advantage of the weight, space and cost savings, plus reliability and accuracy improvements.

• Research unintended consequences. If time and/or financial budgets require staging upgrades (like we did), will one stage interfere with another? Will desired upgrades need to be done in a specific order?

• Trial fit the options. Make full-scale prints of the options that look promising. Tape them to the panel in various locations and mock operate them. Look at them in relation to the rest of the panel. Can they be seen clearly? Could they be operated easily? Primary instruments must be in the pilot’s “field of vision” (see FAA AC 23.1311), plus will they work in the contemplated locations?

• If two or more options seem to be equally promising, make a chart or spreadsheet listing the key features of each option. Identify the features that are most important (the mission definition helps here). The pros and cons of each option will start to reveal themselves. Don’t forget about database and estimated installation costs.

• Research panel requirements. Many instrument panels “float” on vibration isolators (shock mounts), while some are rigidly mounted.  Still others may be a mix. The panels in very early Bonanzas, for example, are structural. Major changes to them may require DER approvals (this engineering effort brings significant extra costs). In contrast, the Baron panels are mixed or full floating, depending on the plane’s vintage. 

• Create a detailed template with actual equipment dimensions. Once a notion is conceived, draw up a detailed layout of the new panel complete with accurate dimensions and components to be on it. Then, make the panel (or get it made) using lexan or Plexiglas so everything can be seen in the plane as it would be once installed. This one step can be a real eye-opener as what looks good sketched out doesn’t always work in reality.

• Study the installation. Once the selections have been made, study the installation manuals (if they’re available) and have shops thoroughly examine the plane before getting quotes. How will new wiring be run, where will new boxes be mounted and how? Is the electrical system up to supporting the new electronics? Do the STC(s) cover the complete installation or will DER services be required as well? For pressurized aircraft, will any modification require penetration of the pressure vessel? A DER design approval could be required. 

• Check on parts availability. With today’s supply chain nightmares, common parts are becoming increasingly unavailable or have obscenely long lead times. How will those items impact the schedule? Case in point—if you tried to find an oil filter lately, you probably found that  many popular ones (including the ones used on my Baron engines) currently have lead times of several months or more. There could be similar back orders for major avionics components.

• Expect problems. Tearing into a panel will almost always uncover unanticipated issues. From abandoned old wiring, previous modifications improperly done to random faults being found, there will likely be additional work to be done. That’s why almost all avionics projects have cost overruns. Will any additional work impact the planned upgrade?  There’s a good chance additional parts will be needed and they may be impacted by supply chain issues.  Is there a downtime cushion to cover any additional work or component delays? 

• Cushion the budget. Unanticipated findings, be it additional parts or repair efforts, are what cost overruns are made of. Not taking that potential into account can easily break the bank. Play it safe and cushion the budget by at least 10 to 25 percent to cover the unexpected.

THAT’S THE WAY IT IS

So we’ve done our homework; “Let’s do it,” says we! So, we call up our favorite reputable shop the next day and ask for an estimate to install our new must-have avionics. They come back with a cost that’s now double or triple what we thought. How could it be so much more?

What that shop did was consider all of the potential gotchas that invariably add to the cost of the installation, and there still might be more when they get the airplane torn apart on the install floor. For a single instrument or two, it might not be too bad. But, what about a major upgrade like this project, with EFIS, engine monitor or integrated autopilot? There might be issues that shops simply won’t know about until they get into the project. That’s time and money. Welcome to the world of avionics upgrades. It doesn’t end there because you’ll still have a shakedown period. 

After a half-dozen flights following my installation, there were a few bugs to work out, notably a mostly inop left engine fuel flow instrument, which turned out to be a faulty termination behind the panel. Given this upgrade probably involved 150-plus connections, I was pleasantly surprised only one gauge had developed issues.

While it wasn’t my intention when we bought the plane, in the end she ended up with triple-redundant ADAHRS (all with battery backup) and dual-redundant FMS, navcomms and engine instrumentation. I dare say she’s more capable than the DC-9s I worked on at the start of my career.