Airframe Cracking? Drill It, Patch It Right

On old aircraft it's inevitable that cracking will set in. Taming vibration and following the guidance in FAA AC 43.13-1B and the MX manual is a good plan

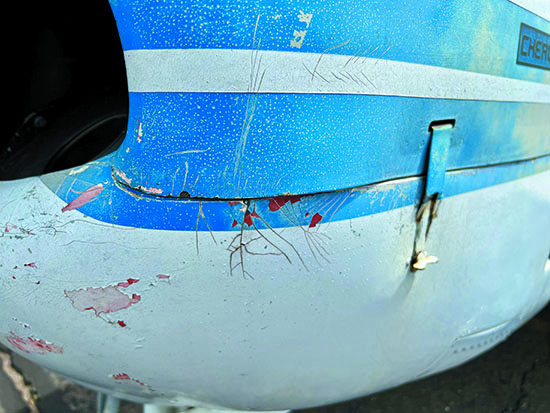
During routine inspections, good technicians dig deep into the airframe looking for structural cracks. And if you’re doing even a causal preflight walkaround it’s not uncommon to find cracks around cowlings, windows and fairings. None of them should be ignored.

Surface cracking doesn’t usually mean a cowling or control surface will come apart, but it’s a clue that weather and vibration are taking a toll. Short of replacing major structural and cosmetic parts, quality repairs are possible and acceptable practice when using the right guidance. Here’s a short primer.

STOP-DRILLING AND OUTGROWTH

Here we’re focused on metal airframes (although some of these repairs can apply to plastic and Plexi), where some areas are more prone to cracking than others. One crack-intensive area is at any crease or sharp bend in sheet metal, such as the aft edges of elevators or ailerons. It’s not uncommon for an aileron or other item to get dented in handling (or even while out in the weather), and eventually it might start “oil-canning.” In time the oil-canning leads to a crack in a corner radius, and you can bet the crack will spread unless it’s remedied.

The remedy (for starters) is to stop-drill the crack. If the crack is a small one and in a low-vibration area, stop-drilling may work long term. But not always. Whether you’re qualified to fix it yourself (you might be able to work on cosmetic components) or have your A&P do it, keep an eye on it by noting the exact location and length of the crack, and monitor it for the next 10 or 20 hours, then every 100 hours thereafter. Take photos. 

If the original crack in metal, plastic or Plexiglas is more than 2 inches long, or continues growing after stop-drilling, a patch should be made. Here, you’re legal since Appendix A of FAR Part 43 allows pilots to make small patches and other reinforcements so long as such patches do not change the contour in a way that interferes with proper airflow.

However, the FAA has a number of things to say about how metal patches should be made. 

• The patch must have a total length not less than twice that of the stop-drilled crack (i.e., a 4-inch patch is needed for a 2-inch crack).

• The patch must accommodate a minimum of four rivets per side in the “long” direction.

• All rivet holes must be at least two rivet diameters from the edge of the patch and from the crack itself.

• The rivet spacing must be a minimum of three times the rivet hole diameter.

• The patch plate must be of the same material (the identical alloy: 2024-T3 aluminum, or whatever) as the area to be patched. Also, the patch must be of the same or next-heavier gauge of material. Think about it: If you used a 0.003-thick bit of beer can to patch with, that would crack in short order, bringing you back to square one, and only with all those rivet holes to deal with now, too.

Hit the aircraft service manual’s section for structural repairs to know for sure the type of metals you should be using for patching. Certain dissimilar metals can be a recipe for galvanic corrosion.

We realize not everyone is skilled with riveting or has the basic tools, but with practice you can get the job done, especially with some help from a mechanic. Know the thickness and which rivets to use. Cherry Max rivets are allowable substitutes for NAS 1398 and NAS 1399 rivets for most purposes, but check your manual for any limitations.

If your plane’s skin is 0.040-gauge or less, 1/8-inch diameter rivets may be used in the patch; for thicker sheet metal, 5/32-inch diameter rivets are required. Non-structural patches are usually made with AN470-A rivets, which are made of soft aluminum and thus can be driven without a special rivet set. 

Overlay patches are acceptable for cowlings, but if you want extra strength and peace of mind, you could fabricate and install a doubler  to go on the back side of the repair area. You could even use it as a pattern to locate and drill rivet holes, then cut a flush (butted, not overlapped) patch to exactly fit the opening in the cowl or whatever. To fit the doubler through the hole, just flex it. We’ve seen some nice repairs done with flush rivets, dimpled skin and countersunk holes. 

We’ve seen some techs use the opportunity to build in an additional inspection plate, using a Tinnerman-nutted double. After riveting the doubler in place, screw the inspection plate down with the usual countersunk machine screws. Be mindful of modifications that could require additional approvals.  

Use AC 43.31-1B guidance when making patch repairs. A patch that’s too small with the wrong rivet spacing won’t be a good repair.

CRACKS IN FAIRINGS

It’s not always about metal repairs. Wingtips, fairings, nose caps, tail cones, dorsal fins, wheel pants and other items tend to be made of Fiberglas or molded plastic. Piper, in particular, used vacuum-molded plastic for such items, even on its most expensive aircraft. Plastic can be stop-drilled and patched in a fashion similar to aluminum (with or without doublers), providing you can find a piece of similar material from which to cut a patch.

While you might not be able to see stress cracks in metal steps, corrosion around the mounting bolts could be a clue that it’s ready to let go. We have leg scars to prove it.

While stabilizing in price thanks to a growing number of high-quality parts suppliers (see a dedicated report on aftermarket plastic in the December 2021 Aviation Consumer), plastic and Fiberglas replacement parts may be your best bet if you don’t want to attempt a repair. But with some effort, you can make a successful patch repair to major plastic components. 

Once you’ve cut and sanded the patch, apply MEK (methyl ethyl ketone), acetone or cyclohexanone to both work surfaces by brush. When both surfaces have softened, quickly press the patch in place while still wet. Keep the patch in firm contact with the work until the bond is set. Don’t even start the engine let alone taxi or fly the plane or apply any shear stresses to the patch until it has cured (24 hours at 77 degrees should be enough to cure it). 

For small cracks in ABS plastic, first stop-drill the end(s) of the crack, then one trick is to mix up some ABS paste by stirring together a little MEK with some shavings of old ABS plastic. Apply the paste to the cracked/holed areas and let it thoroughly dry. 

Walk the tiedowns and you’ll find plenty of birds like yours with ABS horizontal stabilizer tips that cracked from cold weather due to the differing rates of thermal expansion (or contraction) between plastic and aluminum. Generally, when plastic tips have been riveted in place, cracks start at the rivets and work outward. Stop-drill the cracks and consider adding intermediate rivets to re-secure the areas on either side of the crack(s). Drill holes and pop in the pop rivets, as necessary.

LOG IT

Since many skin repairs will be obvious, make sure the repair is properly logged in the aircraft’s maintenance records. Ones that aren’t will get the attention of someone doing a pre-purchase evaluation when it’s time to sell. But repairs done right and properly logged show good upkeep.

Last, do more than a quick look-see during your preflight walkaround. Pay attention to the skin around the base of antennas, look closely at propeller spinners and especially at the rivets on control surfaces. A sharp eye—and a solid repair to cracks you’ll inevitably spot—can prevent an accident.

Editor in Chief Larry Anglisano has been a staple at Aviation Consumer since 1995. An active land, sea and glider pilot, Larry has over 30 years’ experience as an avionics repairman and flight test pilot. He’s the editorial director overseeing sister publications Aviation Safety magazine, IFR magazine and is a regular contributor to KITPLANES magazine with his Avionics Bootcamp column.