Compass Swings: A Forgotten Task

Who needs an old-school wet compass? You might if the electronics go down. Keep it maintained with regular calibration

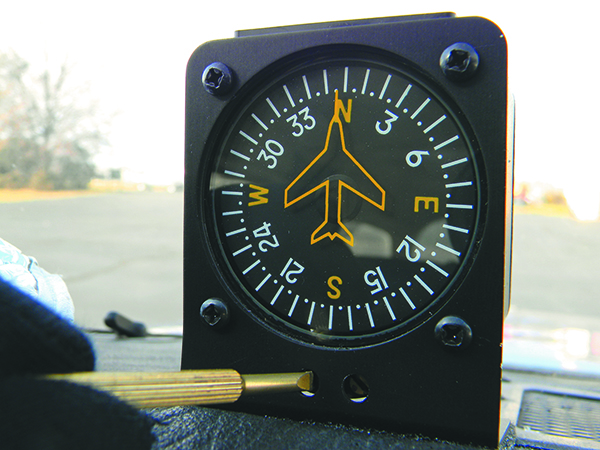
Shops know it’s a chore that needs to be done, but the truth is compass swings are often forgotten during the final stages of avionics projects. Compass calibrations can be time consuming, but done properly the task can pay back big time if the instrument was your only means of backstopping the aircraft’s true magnetic heading.

Luckily, with a bit of knowledge and patience you can periodically check the accuracy of the instrument by swinging it yourself. Here’s a technician’s guide for tweaking the old standard.

WHY SWING IT?

Some airports like Meriden Markham in Connecticut have designated and well-marked areas for compass swings.

As simple as they are compared to modern-day electronic flight instruments, magnetic compasses are widely misunderstood, as are the regs that govern them. It’s FAA Advisory Circular 43-215 that deals with their specifics of calibrating a magnetic compass and it’s worth a read. But calibrating and maintenance are two different tasks. Want to tear one down and rebuild it yourself? Think twice, even though upkeep on these stone-simple instruments is considered specialty work. According to FAR 65.81, any repair or alteration of instruments on certificated aircraft—and the wet/vertical card compass is one of those instruments—may only be performed by a certified instrument repairman. That also means if you calibrate one on your own, technically it should be supervised and signed off by an A&P although that often doesn’t happen. After all, the Advisory Circular says that certificated airframe mechanics and FAA repair stations with appropriate ratings are authorized to perform compass swings. Still, some techs we talked with said  they would consider signing off an owner-performed compass swing if the correction card was filled out properly, and they confirmed that the job was done correctly. More on that in a minute.

The FAA’s AC 43.13-1B says compass calibration should be accomplished anytime inaccuracy is suspected (off more than 10 degrees), after any cockpit mod involving ferrous metal and whenever the compass has been subjected to shock, such as a hard landing or severe turbulence. 

“When we put in a magnetometer as part of an EFIS installation we usually correct the compass and provide a new compass correction card,” TJ Spitzmiller from Sarasota Avionics in Florida told us. Our advice is to ask the shop if it plans to swing the compass as part of the job. If you want to tackle the job yourself, even to determine how much error the instrument has, there’s a precise process.

LET’S GO SWINGING

If you can’t find a designated compass rose at a local airfield, you’ll need a calibrated sight compass. This method requires two people.

If you want to attempt it yourself, you can find an official compass rose. This is an interference-free painted area on the field for positioning the aircraft and making the adjustments. The rose is oriented to magnetic north, while cardinal points are normally painted 30 degrees apart.

The compass must be swung with the plane in a flight configuration, meaning a tailwheel airplane will need to be raised to a level flight attitude. The engine(s) should be running and all typical avionics and lighting used in flight turned on. That makes a big difference. Watch your compass swing to a new heading the next time you start or stop the engine and turn stuff on and off.

That’s a Garmin G5 EHSI and remote magnetometer. That installation should certainly include a compass swing.

AC 43.13 recommends that the thorough procedure is done both with all electronics on—simulating basic flight conditions—and with the avionics off. A compass card should be made to reflect both conditions.

Other than the sight compass, there really aren’t specialty tools required, although you will need to make adjustments with a brass or other non-magnetic screwdriver, and often a narrow tip is required.

What you adjust are the compensating magnets in the compass that are designed to compensate for electrical and magnetic influences of the aircraft. (They affect deviation, as opposed to the magnetic influences of the earth, or variation.)

There are two screws on the face of the instrument (sometimes covered by a removable plate), which move the compensating magnets. The two screws are labeled N/S and E/W. Be sure to remove any material from the glove box and surrounding areas.

Put the aircraft exactly on magnetic north and adjust the N/S compensator screw until the compass reads 0 degrees. Turn the aircraft and put it on east and adjust the E/W compensator until the compass reads 090 degrees. Continue by placing the aircraft on 180 degrees and with the N/S screw, remove half of the south heading correction. Obviously this will throw off the north correction, but the error will now be divided equally between the two headings. Last, go back to west and adjust the E/W screw to remove half of the west error. 

Once the compass has been swung successfully, the results are recorded on a compass correction card, which is mounted next to the compass. Errors up to 10 degrees between the compass heading and a magnetic heading are acceptable. If the errors are greater than 10 degrees, there could be strong influences in the cockpit that the compensating magnets can’t cope with, or you were sloppy during your lineup. Start the correction card with a west heading with and without the radios on. Work your way around the rose, making correction notes every 30 degrees. Once you have the compass calibrated, fill out the correction card and be sure to record the date that the calibration was accomplished. Don’t forget the logbook entry.

IT DOESN’T ALWAYS WORK

Sometimes even the best calibration attempt won’t save an old magnetic compass and either overhaul or replacement will be required. Warning signs include leaking fluid and maxed-out adjustment compensators. We’ll look at what’s available for new units in a separate article. 


Editor in Chief Larry Anglisano has been a staple at Aviation Consumer since 1995. An active land, sea and glider pilot, Larry has over 30 years’ experience as an avionics repairman and flight test pilot. He’s the editorial director overseeing sister publications Aviation Safety magazine, IFR magazine and is a regular contributor to KITPLANES magazine with his Avionics Bootcamp column.