Control Rigging: Critical, Yet Forgotten

Having the aircraft properly rigged per the maintenance manual can pay back big, and even avoid component failure and loss of control.

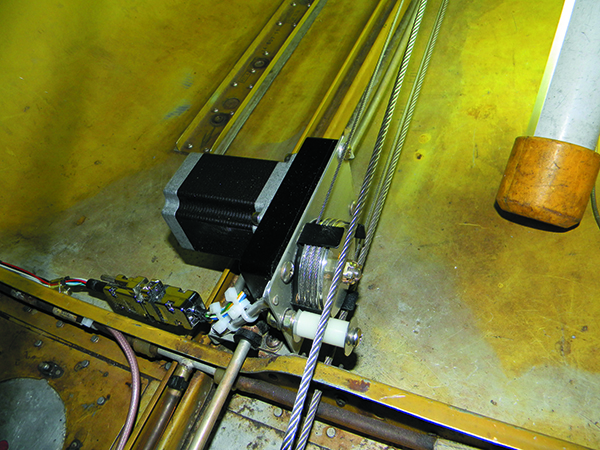
Who has been working on this airplane? That was the question we would often ask in the shop when an airplane would come in for autopilot troubleshooting and we found control cable tensions so low you could strum a tune with them. Oftentimes it was to troubleshoot pitch and roll problems where the autopilot would deviate from the selected altitude or blow through the desired course. Then there were pilots who would complain the airplane wasn’t making book speeds, the controls weren’t as responsive as they once were, or the airplane wouldn’t fly straight and level. All are symptoms of rigging problems.

Owners give it little thought, and it’s a maintenance item that should be checked during annual inspection, but it often gets dropped. Moreover, when faced with the hefty shop labor to properly rig the airplane the way the manufacturer’s maintenance manual prescribes, many owners put it off. That’s a bad idea, especially when investing in a new autopilot. Read on for a lesson in control rigging 101. 

DIY RIGGING CHECK

It’s easy to get complacent and not even recognize there’s a rigging problem. That is until you fly a similar model and notice how much tighter the controls feel, how it’s easier to keep in trim or how it flies just a touch faster than yours. Before taking it to the shop, do some checking yourself. Here’s a review.

As shops will attest, the specialized tools needed to precisely analyze and adjust the rigging are expensive, but aren’t needed for a general status check by non-mechanics. Look for some early clues by paying close attention to control surfaces, and how they feel when manipulating them: Is the trim tab bent? Do the controls feel stiff? Does the aircraft wander about the roll and pitch axes and is it a chore to accurately trim? It can be argued that observing an aircraft’s state of trim is subjective, but there is nothing at all arbitrary about diagnosing an out-of-rig airplane. 

For starters, bring the plane to a level area of the ramp where you can run the engine. Verify that the ground is level, then level the airplane laterally. You can do this using the leveling points specified in the airframe maintenance manual, although on many aircraft, you can simply put a bubble level across the pilot’s and copilot’s seat tracks. You could also let some air out of one main tire, provided the attitude isn’t such that you will have to make one tire flat to level the wings. Be sure the struts are equally level, and that one is not stuck extended or retracted. Don’t forget to compensate for the lack of weight in the pilot’s seat. Have someone of equal weight sit in for you.

The teardown during paint projects, could lead to control rigging – and balance – issues. It’s a good time to perform a rigging job and of course, weigh the aircraft when the paint work is finished.

With the airplane in perfect lateral level, adjust the turn coordinator so the inclinometer ball is perfectly centered. This could mean removing the false panel to access the instrument’s mounting screws, which are elongated to allow adjustment. Eliminate parallax (the apparent displacement of an object due to a change in the position of the observer) by adjusting the seat to the position you normally have it in flight—and your head in an equally normal position. When you are satisfied the instrument is perfectly level and the ball is centered from where you sit, retighten the mounting screws. If this is a steam gauge airplane, make a similar adjustment to the attitude indicator while it’s fully erect. You’re only concerned with lateral level here—the airplane may or may not be level with pitch at this point—so don’t be concerned with the horizon’s pitch display.

Don’t ignore a stiff or binding pitch trim. The command wheel should be smooth and the trim action should be linear.

Next, make some checks outside the airplane. Get a straightedge of the appropriate length and check each cockpit-adjustable trim tab for fairness. The cockpit indicators may indicate neutral, but they may be lying. Get out and make sure they are actually in a neutral position, which is fair with the trailing edge of the control surface the tab is attached to. If there is disagreement between what the indicators show in the cockpit and the actual position of the tabs, make a note of it and mark the actual neutral position on the trim housing in the cockpit. 

From the outside of the airplane, make sure that the cowl flaps retract uniformly and completely. Also check for looseness. Note that some cowl flap systems are designed so that the flap trails slightly in flight. Read the manual.

Done right, properly rigging a complex twin or single could mean sizable teardown and as much as two days of shop time, especially if aging components need replacement. That’s often the case as airframes age and the multitude of small parts in the control system wear out.

Check the wing flaps and make sure they retract together and come up fairly even. Stand at one aileron-flap juncture and hold their trailing edges together. Does the outer trailing edge of that aileron line up with the trailing edge of the wingtip? If it does, is the control yoke or stick level? If you see the opposite aileron is level with the flap and wingtip, you may have picked up some valuable clues. A sagging aileron or flap may be the cause of tremendous trim drag. However, unless you have found something terribly awry, check your airframe manual before leaping to possibly erroneous conclusions. For most designs, though, the trailing edges of the flap, wingtip and aileron should fair together to form a straight line or smooth curve.

FLYING IT

Set aside some time where you can fly the airplane to focus fully on the rigging. Pick a calm day (turbulence will make this more difficult) where you can fly VFR without interruption. If possible, ask a mechanic to come along. Fill the fuel tanks and empty the baggage compartments. Use caution, as some aircraft are out of their balance envelope in this configuration, so you might have to compensate. Remember that you are looking to achieve lateral balance in the air. If you nearly always have passengers, then you will want to proceed to check your rigging based on a balanced lateral load (which means taking an equally weighted passenger along). If you fly solo most times, check the rigging based on the unbalanced load of your butt in the left seat. 

Once airborne, accelerate to the normal cruising speed in level flight. Feel free to use the elevator trim, but leave the rudder or aileron trim tabs neutral. Come off the rudder pedals and roll the wings level using aileron (providing a wing was low) referencing the attitude instrument. With the heavy wing leveled and the skid ball centered (without your input), note the rudder trim indicator’s position and mark the exact position. Masking tape works. Note whether the heavy wing is still heavy. Chances are it’s not, or at least not as bad as it was. If it still takes some aileron input to hold one wing up, adjust the aileron trim to compensate.

Note the aileron trim indicator’s setting the same way you did for the rudder trim. On a side note, if your instructor never clued you in, this is really the correct way to trim an aircraft for level flight. Some refer to it as the tail-first method. Trim the elevator to hold proper pitch, then the rudder to get the ball centered and finally the ailerons to get the wings level. This is easier in aircraft with cockpit-adjustable trim tabs or no movable tabs. If the tabs are put into a neutral position and you still find that constant control pressure is required to keep the ball centered and the wings level, the airplane’s rigging demands more scrutiny. Its inability to fly straight and level without having one or more trim tabs deflected means it is losing airspeed to trim drag.

SHOPPING TIPS:  HIT THE LOGS

If you’re shopping for a used aircraft, the attention paid to the aircraft’s rigging will speak volumes for how it was maintained, overall. Start with the logbooks and look for the magic words that indicate it’s been rigged—especially if the airplane has been painted.

You should see something along the lines of: “Control surface rigging checked and found to be in conformity with manufacturer’s specifications.” We’ll bet that you come up empty for the majority of aircraft you research.

If the aircraft has been painted, you might see wording from the paint shop that a control surface has been balanced, but this doesn’t mean all surfaces were rigged. 

In some instances, an airplane may have been improperly rigged right out of the factory. If it’s never been checked, it’s still improperly rigged. An especially hard landing can cause a change in the rigging. In these situations, external damage (perhaps wrinkled skin) should be visible, but is often missed. It’s possible the damage may be more than cosmetic. Even if it was repaired, it may not be ready for flight.

One case of unrelated maintenance and rigging problems that comes to mind involved a Piper Saratoga. During the course of the repair, the nosegear and engine mount were removed for repairs. New nosegear bushings and straightening/rewelding of the engine mount was accomplished. Reassembled and with the nosewheel centered, it was obvious the rudder was slightly cocked to one side. The new repairs had corrected a past asymmetry problem, which now showed up as the cocked rudder.

Previous damage showed up during a shop inspection of a high-powered twin. It was noticed that the left aileron ground-adjustable trim tab was intentionally bent to nearly maximum deflection, and an extra ground-adjustable trim tab had been installed on the right aileron (it, too, had been bent to nearly maximum deflection). The cockpit-adjustable rudder tab had been adjusted quite far off to one side. Closer examination of the airframe revealed an extra stall strip fitted to the right wingtip.

The wing was bent—apparently in an exceptionally hard landing years before. Attempting to compensate for the asymmetric airframe, mechanics, through the years, had bent the aileron tabs to their maximums. No doubt this airframe wasn’t making full speed and its new owner was blindsided with major repairs. In our estimation, a deeper prepurchase evaluation might have helped.

WHO’S GONNA DO IT?

If you’re committing to a new autopilot installation, we strongly suggest picking a shop that has experience rigging the controls. We recently heard a nightmare story of a complex twin that had a new Garmin autopilot installed, but the installing shop didn’t have the capability to rig the cables per the aircraft’s maintenance manual. When the owner retrieved the aircraft, he was disappointed to find the old autopilot performed better than the new digital one. He ended up bringing it to a shop that specializes in the type. That added time and more expense for a task that should have been done before installing the autopilot. 

Last, control rigging  (or lack of it) can pose a safety of flight issue. We remember a taildragger that ended up in the weeds in a stiff crosswind because the rudder cables had so much slop the pilot couldn’t obtain full deflection when he needed it the most. A $1000 rigging job could have ultimately prevented a $10,000 repair.  


Editor in Chief Larry Anglisano has been a staple at Aviation Consumer since 1995. An active land, sea and glider pilot, Larry has over 30 years’ experience as an avionics repairman and flight test pilot. He’s the editorial director overseeing sister publications Aviation Safety magazine, IFR magazine and is a regular contributor to KITPLANES magazine with his Avionics Bootcamp column.