Engine Baffle Seals: Worth Replacing

New seals can boost air-cooling efficiency and ultimately increase engine life. Save money and do it yourself.

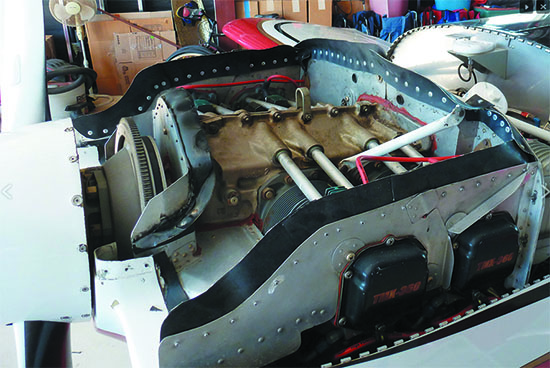
You seen them when the cowling is off, but perhaps pay little attention to the condition of the baffle seals on your engine. These are the strips of rubber that sit under the cowling lip, directing airflow through the engine cooling fins. They start out soft and flexible, conforming to the shape of the cowling, but as time goes on, they lose their flex, become brittle and can even break. This allows critical cooling air to escape the cowling, and up go the temps.

The good news is that baffle seals aren’t difficult to replace, and if you participate in owner-assisted annuals or do your own maintenance, you can restore your engine’s cooling efficiency in just a few hours. Here’s a guide for DIY replacement.

CONSUMABLE ITEMS

Baffle seals are in the same category as filters, spark plugs and tires—consumable items that need periodic replacement. Good seal material will last more than five years, but probably less than 10 if you use your airplane a lot. More severe temperature exposure will wear them out more quickly, and it pays to keep a fresh piece handy to compare to your installed seals during annual inspections or anytime you have the cowling removed. If you think your seals are getting stiff, they probably are. 

We lowered CHTs about 20 degrees across the board with a fresh set of seals on an 1800-hour engine installation. If managing your temperatures is getting frustrating, this might be a quick way to tame the dragon. Total time for a complete redo was about four hours in the shop—very little time for a very large gain.  

Unfortunately, aging seals are a problem for folks who go long periods between engine swaps, no help from mechanics who overlook them. But your engine could be telling you they need replacement. My Van’s RV-8 is a good example. First flown in 2005, it now has almost 1800 hours of hard flying on the airframe and engine. The baffle seals are original, and keeping the CHTs down in the reasonable range has been getting harder and harder. Noting that I have to take more care in climbs, I have thought about timing (the engine has electronic ignition, and advancing the spark generates more heat), airflow changes, and even wondered if my recent home base change to almost 5000 feet MSL has contributed to the problem. While the answer to those questions is probably “yes,” the main reason we have seen higher temps is probably the oldest one in the book—worn and stiff baffle seals that allow cooling air to escape from the upper plenum area of the cowl. 

A careful examination of the seals gave proof of the problem. With a piece of new baffle seal in one hand, fingering the old ones showed a marked stiffness compared to fresh material. It was also apparent that in several spots, the seals had taken a “set,” and were no longer conforming to the cowl. Finally, a close examination showed cracking and stress where the material was required to make a tight turn—sure signs that it was time for a replacement. The good thing about the Lycoming installation on an RV (and many other airframes) is that you can do all of the work with just the top cowl removed; very little disassembly is required. If you have a taildragger, putting the tail up will make the engine compartment much easier to reach, and a short step stool or work platform will make the work almost luxurious.

PLANNING THE JOB

Before you start, make sure that you have plenty of new baffle material and fasteners appropriate to the job. Van’s design uses large-head pop rivets, which are cheap and easy to work with. Others use screws and backup plates. I have seen production airplanes that simply used staples. But using steel staples in aluminum baffles is a great way to ensure disposable baffles due to corrosion. If you find that to be your design, you might think about upgrading. You will need surprisingly few tools to do the job. In the case of my pop-riveted attachment, I used a drill with a #30 bit, an angle grinder with a sanding disk, an automatic center punch, dikes and a pop-rivet puller. Throw in a razor knife and a few Clecoes to help cut the new material, and that’s it.

There are, of course, numerous choices of baffle seal material. Most material comes in 3- or 4-inch-wide rolls. I actually prefer to use sheet material because it allows more complex shapes and fewer segments. I have used orange silicone, blue silicone and standard black material; it all seems to last about the same number of years, so long as it is the stuff that is fiber reinforced. In my case, Van’s sent a roll of the black material about 12 inches wide with their kits, and one roll is more than enough to do a standard four-cylinder Lycoming installation.

Limp, soft, leaky. That’s what worn-out seals look like on a forward baffle, top. Use a sharp automatic center punch, middle, for taking out the tight-fitting mandrels. Don’t drill through the rivet, bottom. Just drill the heads off and remove the seal material.

OUT WITH THE OLD

Most baffle seals are installed in segments, and this makes it easy to simply work your way around the rim of the baffles, replacing one section at a time. Drilling out old pop rivets requires a few simple tricks. Start by popping the old mandrel out of the middle—use an automatic center punch with a small, sharp point inserted from the head side of the rivet. A few snaps and the remains of the mandrel should pop out the other side with great velocity. Safety glasses are suggested! Getting rid of the mandrel leaves only the soft aluminum head and collapsed shank. Drill from the head side with the #30 bit, and the head should come right off—the hole in the rivet will center the drill nicely. Once you have drilled off all of the heads holding a given segment of material, you can zip off the seal material, and only the shanks will be left in the baffles.

Removing the shanks is simple: Use the angle grinder with a coarse sanding disk on the head side of the baffle to grind them down flush to the aluminum. It’s OK if you “polish” the baffles a little—it will be covered by the new seal material, and you won’t see it. With the shank ground down flush, grab the tail of the rivet with a set of dikes from the other side, and it should pop right off, leaving a clean hole that has not been enlarged by drilling through.

IN WITH THE NEW

Duplicating the old segment of baffle seal can be tough if it is warped out of shape, but the task is made simple by using a piece of sacrificial plywood and some Clecoes. Lay the old piece on top of a new strip or sheet (making efficient use of the sheet—think ahead to make the best use of your material) and drill through one of the old rivet holes, through the new sheet, and into the plywood. Cleco the sandwich to the board. Now lay the material flat and drill the next hole—Cleco it as well. Continue until you have filled all of the holes with a Cleco, and the sandwich of old and new should be relatively flat. Now take a new razor knife and cut all the way around the piece, pushing it flat as you go around the edges. You should now have a perfectly duplicated segment—with holes ready to reattach. If you built the seals originally and remember how much time went into figuring out how each one should be shaped and fit, this is going to seem like magic—or cheating. All you have to do now is pop rivet the segment back into place and move on to the next one.

If it looks like the old seals are a bit short, this is the time to lengthen them. Just trim a little outside the lines on the top edge when cutting the new pieces. When you get to overlaps with adjacent pieces, you might leave a couple of rivets out, then move on to the next segment and deal with those rivets when installing the next one. I recommend doing one segment at a time, rather than drilling off all of the old baffles and then trying to remember how the entire jigsaw puzzle fits back together. 

If you really want to do it that way (for instance, if you are thinking of painting the baffles), take lots of pictures before you remove everything so that you can go back and remind yourself how they fit together.

CLOSE THE GAPS

I find that after seals have been installed, there are gaps that need to be filled between the base of the seals and the baffles themselves. This is why they invented 500-degree silicone RTV! You can spend a lot of time trying to get seals to lay perfectly flat, and they will still gap when the baffles change shape as they heat up, so silicone is your friend. Use black or red (or blue) to match your seal material and look carefully for holes and gaps. Fill them all—it takes only a few small holes to lose a significant amount of cooling air. Also make sure that you have left generous overlaps between segments of seal. This is no place to skimp, or you’ll lose a lot more air out of these cracks and gaps.

As for sourcing the seals, Aircraft Spruce sells silicone Mil Spec baffle seals with a heat rating of -80 F to +425 F, available in red, blue and black. It also sells the appropriate pop rivets. Pricing is roughly $9 per foot. Wicks Aircraft is another source, selling Nigencord seals coated and cured in neoprene. A 3-inch-wide and 9-foot-long piece is $61.


Contributor Paul Dye is the Editor at Large of sister publication KITPLANES magazine, the retired lead Flight Director for NASA’s human space program and an EAA Tech Counselor. Watch his Firewall Forward technical video series at www.kitplanes.com.