by Cory Emberson
Nothing looks better on an airplane than fresh glass and few things short of structural damage look worse than beat-up, scratched windows and windshields. Damage to aircraft windows is more than a cosmetic challenge, too-it can compromise flight safety by limiting your ability to see traffic or even the destination airport. Throw in a little rain or window fog and you can be blind.
While many aircraft detailing companies specialize in removing scratches from aircraft windows, a number of products on the market purport to allow spot repair of damage glass by the do-it-yourselfer. We recently tested a few well-established scratch removal systems to see how we’ll they repaired some worst-case scratches. We learned that the product directions must be followed to the letter and learned that Harry Callahan was right-a mans gotta know his limitations.
How We Tested
We used a brand-new acrylic window intended for a Mooney 201, unused by a local shop customer. We divided the glass into four sections with masking tape and identified the scratch removal methods on the tape. Two sets of scratches were inflicted on the glass: a severe scratch produced by three passes of a -inch common screwdriver blade and a separate single scratch several inches below it. (And yes, there was cringing.) The test scratches were the only blemishes on this acrylic, making the evaluation of the marks and the repair attempts as clean-cut as possible. Half of each section was covered by paper for comparison after the test.
Because the major scratch removal products are not perfectly comparable-all were applied using power tools and one (Novus) was also applied by hand-minor variations in the results were expected and observed. Novus is generally applied by hand, with power application as a choice for severe scratches. Digging into the Plex with a screwdriver qualified as severe, so we used both application methods. Even the single scratch was evidence of more damage than we normally see on an aircraft window. So we offer a caveat to account for this: The hand-applied product did not completely remove the severe scratches and, as a corollary, more was expected of the power-assisted products.
Plexi 101
For the purposes of this article, we’ll examine scratch removal only, but a word about prevention first. Its a simple matter of taking exquisite care with your aircraft glass. Dont use terrycloth or, even worse, paper towels (which have wood fibers in them) on your airplane windows. Anything thats harder or more abrasive than your windows will scratch them.
Terrycloth will pick up and hold debris, creating an impromptu sanding block. Clean microfiber cloths (80/20 or 70/30 blends of cotton and synthetics), available in auto and marine supply stores, are ideal for this purpose. The microfiber traps any dust and debris on the window, absorbing it into the cloth and pulling it away from the window surface.
And never use glass cleaner on acrylic (Plexiglas or Lucite) or polycarbonate (Lexan) windows. Glass cleaner, specifically ammonia, will cloud and ruin them. Last, always wet the plastic first before applying a cleaner and keep it wet throughout the process. If the damage to your glass is minor, self-diminishing creams should be your first solution. Before you treat an entire window, test them on a small corner first. And be sure to familiarize yourself with the application technique for the product before you launch-theyre generally applied parallel or perpendicular to the scratch.
Circular application should only be performed if the directions call for it specifically. Any of these products should be applied out of direct sunlight, which will dry the compounds prematurely and increase their aggressiveness. If there’s no shade to work in, keep the area misted with cool water and work early or late in the day.
Novus
The Novus system is well-known in the marine and motorcycle communities for a product set that contains three levels of aggressiveness: Novus 3 for heavy scratches, Novus 2 for fine scratches and Novus 1 for polishing. A kit containing two-ounce bottles of the three compounds retails for $14.95. We first removed any surface dust with a microfiber cloth, followed by firm manual application of Novus 3 at a 90-degree angle to the scratch.
The directions recommend that you repeat this as needed-we applied Novus 3 four times. Once the damage was reduced to only fine scratches, we cleaned off the remaining polish and applied Novus 2 in a circular motion until dry.Finally, we applied Novus 1 to polish and buff with a clean microfiber cloth.A note: Novus 3 should not be used on coated plastics or polycarbonates.
In our test, the hand-applied Novus 2/3 combination was reasonably effective on the single scratch and while it mitigated the severe scratch somewhat, it did not eliminate it.
The second Novus panel was the test bed for application with a power buffer, a less labor-intensive process and only somewhat more effective. The depth of both scratches was reduced, as detected with a fingertip and a fingernail, but both were still visible after the treatment. We used a clean cotton bonnet, running the buffer at 1000 RPM for 10 minutes between the Novus 3 and 2 compounds. The major upside was that it was a lot less work and it wasnt overly messy.
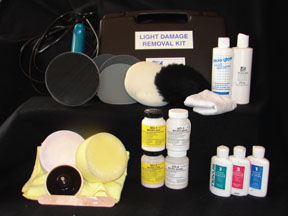
Micro-Mesh
The Micro-Mesh Light Damage Kit is one of several offered by the company. A Heavy Damage Kit is also offered, as is the familiar KR-70 kit, which uses a foam block, a number of progressively finer sandpaper sheets and Micro-Gloss scratch removal liquid. Weve used that kit before and while effective, its time- and labor-intensive.
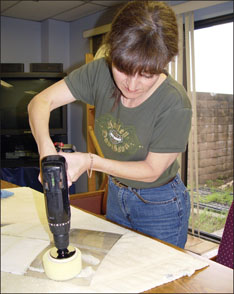
The Light Damage Kit is designed for use with a random orbital sander and a right-angle polisher. In our view, its we’ll suited for this type of damage in that the sweat factor is reduced. An added bonus is that there’s less temptation to rush the job.
A screw-in backplate is used to carry three grades of sandpaper pads included in the kit: 1500, 2400 and 3600 grit. For the last two power-assisted steps, a black TufBuf polishing pad (resembling a small swatch of fluffy shag rug) and a white foam pad are used to apply the Micro-Gloss fine abrasive compound. Last, a clean white flannel cloth, also included, is used to apply an antistatic polish.
Debbie Abrams of Micro-Surface Products recommends that you have the right tools-and enough time-for the scratch removal process. Do not try to restore a window under time constraints. To be successful, all damage must be removed after the first step. Take the time to be thorough-if you arent, you will be left with a less-than-perfect restoration and will be wondering what step you need to repeat in order to have a perfect window.
The directions for this process are detailed and its crucial to read them thoroughly before you start. Its important, too, to keep the surface wet with a spray bottle throughout the process to prevent friction heat damage to the window. Each step should take three to five minutes per square foot of plastic. The Light Damage Removal Kit, which we used, retails for $95, with enough product to cover 100 square feet of plastic.
Scratch-Off
The Scratch-Off system uses four progressively finer compounds matched to two different foam pads which are attached to a backing plate for use on a power drill. The standard Scratch-Off kit, with enough product for one aircraft windshield, retails for $34.85; the deluxe FBO-sized kit, enough for several aircraft, sells for $66.50.
Which compound you start with is determined by the extent of the damage-gouges and chips will take the full course of treatment while hairline scratches, hazing and swirl marks may be repaired with the two finer compounds. The two coarser compounds are identified with yellow labels, matching the yellow foam pad: SO-1 (Micro Cut) and SO-2 (Micro Lite). They are designed to cut and remove deep marks, while the compounds used with the white pads, SO-3 (Micro Brite) and SO-4 (Microsheen) are used to remove swirling and for high-gloss polishing.
The first step calls for wet sanding with 600-grit sandpaper, which is not included in the kit. Take your time with this product as we’ll and keep the RPMs below 1200. If the acrylic surface starts to overheat, spray the area with water and reduce the RPMs. Its important to note that this product is not recommended for use on pressurized aircraft. Any window work on pressurized airplanes should be done by professionals.
A side note about equipment usage: The Makita orbital sander we used didnt come with the thin open-ended wrench needed to remove the back plate.We had to buy one of those separately to get everything taken apart. While using an orbital sander and an angular polisher may be the best method for products like Micro-Mesh, it required an extra purchase at the home supply store. In our view, the ability to use more common tools would not only reduce the cost to the consumer, but would widen the field for use of this product.
Recommendations
While the manually applied Novus required less preparation, it took four applications over the course of 10 minutes to see noticeable results. The light scratch was diminished, but not removed, something that could be a function of arm strength. The severe scratch was repaired somewhat, but that kind of gouge requires more horsepower to really fix correctly. The manual application seems most appropriate for the more common light scratches, such as a brief encounter with a headset.
The powered version of the Novus application was more effective, but didnt completely remove the scratches, either. The test scratches were severe and, to be fair, were probably beyond the capabilities of this product.
The Micro-Mesh system was a real challenge for us and if we were to use this method on a live window, we would want a lot of practice on a spare piece of plastic. Part of Micro-Meshs effectiveness is the progressive abrasive sandpaper pads, but the utmost care must be used if you do this yourself. The sandpaper pads abrade the plastic as part of the cure and the resultant scratches must all be removed and blended to avoid surface distortion.
We used a lot of water in this process and discovered that every square inch of the window being treated must be kept wet. The orbital sander generates a lot of torque and we inflicted a burn mark on the acrylic. Not good. Further, using this method on a small piece of window made it more difficult to remove the extraneous circular marks left by the sandpaper. The manufacturer stresses that sufficient window area be available for product application.
We found the Scratch-Off system easy to navigate and the directions were clear and readily understandable. Color-coding the compounds to the foam pads eliminates errors caused by possible distractions or inexperience. The only real minus was the lack of 600-grit sandpaper in the kit. We feel that inclusion of that small item, necessary to start the process, would be a plus.
On the other hand, designing the product for use with a common hand tool is one of Scratch-Offs strengths. Scratch-Off did a very good job in mitigating both the single scratch and the heavy gouge and although these deep gouges were not completely erased, the lighter scratches that accompanied the gouges were repaired. The final polishing stage left the Plex with a high gloss and the foam pads were easy to clean for future use.Therefore, Scratch-Off is our first choice in this group of products.
The level of damage we inflicted on the window may not allow for do-it-yourself repair, so for lesser damage, Scratch-Off should shine. Also, if a scratch is too deeply embedded in the window, the subsequent abrasion repair may compromise the integrity of the window by removing too much material thickness. If its more than a fingernail-depth scratch, check with a pro.Replacing the window may be safer, given that a bird strike on a thin spot could cause failure of the entire windshield.
Also With This Article
“Checklist”
“Rain X vs. Rain Away”
Contacts
Aircraft Spruce (Scratch-Off), 877-4-SPRUCE, www.aircraftspruce.com
Micro-Surface Finishing Products, 800-225-3006, www.micro-surface.com
Novus, Inc., 800-668-8760, www.noscratch.com/novus
-Cory Emberson is Aviation Consumers copy editor.