Assuming you have an accurate way of measuring it, there’s good reason to fret about high and even low oil temperature.
As you read this December issue, your current goal might be moving (and keeping) the oil temp needle into the green, but think beyond the calendar. There could be a variety of reasons you are seeing high and low readings, and the fix might be easier than you think. We’ve seen shops and owners tear into the engine looking for a problem that didn’t really exist inside. Here’s a technician’s way to troubleshoot the basics first.
RAM AIR, BAFFLING

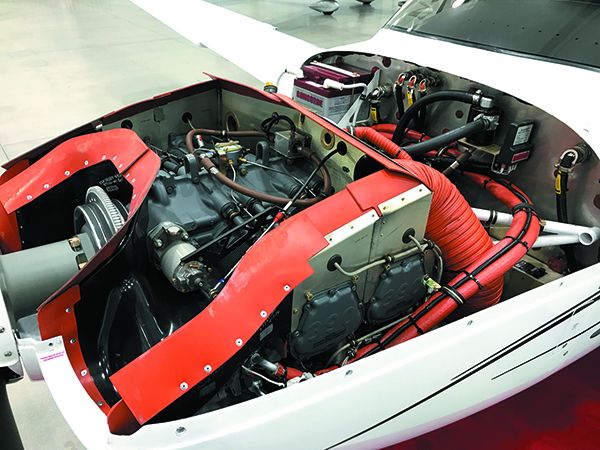
Engine baffling is one of the more neglected accessories on the engine and many just don’t realize the critical role baffling plays in controlling temperatures.
While baffling has a big effect on CHTs—something also worth fretting over—oil temps too are affected by the condition of the baffling. In many cases what you got away with when the OATs were lower in the winter weather won’t cut it when summer arrives—especially if you are climbing higher to get to cooler air and subjecting your engine to prolonged high-power climbs. Installing a new or overhauled engine? Spend the extra bucks for new baffling, or at least carefully evaluate the existing ones.
This is easier said than done because baffling doesn’t have to appear broken and worn for it to be ineffective. For one thing, that flexible rubber material becomes a little too flexible. It’s simple—the aerodynamic loads on the baffling force the leakage of excess air, disrupting the airbox effect. In some cases the baffling is healthy but it’s just improperly installed. There’s a science.
Ram air doesn’t just swish about and exit. The factory designed either an updraft or downdraft airflow system so maximum cooling will get to all the cylinders and then back out in one flowing direction. Additionally, some engine airbox designs are much more effective than others, just as some engines never seem to have cooling issues, while others are scorchers. The Piper Malibu comes to mind, with a big engine that’s tightly cowled without cowl flaps. In these installations the engine baffling is extremely critical.
It’s not just about the main baffling. Doing a teardown overhaul? The aluminum inter-cylinder baffles are sometimes left off when an overhauled engine is reinstalled. If you have any question about your overhauler’s inspection process, backstop it and ask if everything is properly in place after the installation or simply inspect it yourself.
If your engine is getting up there in time, temperature issues aren’t uncommon. One issue is blowby, as the accumulation of excessive combustion contaminants in the oil reduces its ability to absorb and reject heat as we’ll as fresh oil will.
A high-time engine with a main bearing that begins to shift will pinch against the crankshaft and this localized heat can cause a rapid elevation in oil temps.
OIL COOLERS 101

Most, but not all, aircraft engines have an oil cooler. Some don’t have them as installed from the factory, but they sure need one. Some are factory approved for an add-on
cooler and plumbed for it. You can find this in the type certificate data sheet as we’ll as some maintenance manuals.
It’s all about flow. Lycoming engines use one of two valve types to control oil to the cooler. Type 1 is an oil cooler bypass valve, an old and not very effective design using a spring and plunger. This valve is normally closed, which then sends all the oil into the cooler.

When there is too much pressure drop across the cooler the valve will open, thus bypassing the cooler.
The type 2 and type 3 configurations use thermostatic bypass valves, or vernatherm. These valves are normally open and as the engine heats up to around 180 degrees F, the valve grows in length, closing off the port and forcing the oil into the cooler. If the pressure drop across the cooler is too great the vernatherm will open (a 60- to 90-PSI drop through the oil cooler circuit), bypassing the cooler.
It’s worth mentioning that most Continental engines that have a factory-installed oil filter (rather than a screen) depend on the oil filter manufacturer for installing the oil filter blockage bypass valve in the oil filter itself. This design and a low bypass mode with cold oil provide the engine with no filtering capacity while this is happening.
Also in Continentals (and unlike Lycomings), the oil thermostatic bypass valve can usually be found integrated into the oil cooler, whether the cooler is mounted in the front or rear of the engine or whether there is a screen or oil filter installed.
Lycoming has the oil filter bypass valve (if the filter is factory installed) in the accessory case. All this means is that you have to examine your engine carefully, especially Lycomings, to understand how the oil cooling bypass system is set up. Dismiss the wives’ tale that a remote oil filter will lower oil temperature—there’s little difference. What does make a difference is regular care and feeding of the oil cooler—the right way.
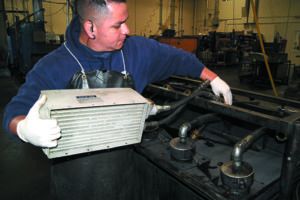
Most specialty shops told us the average lifespan of an engine-mounted cooler can be around 10 to 12 years. Common failure modes include stress cracks and corrosion-induced leakage. Remote coolers can live as long as you, but only if serviced regularly and properly.
A hard failure isn’t the only reason to service or replace a cooler. The other concern is blockage, and that’s obviously a problem. Moreover, by nature of its design, the oil cooler makes for an effective secondary filtration system, catching carbon, metal and other engine contaminants. Simple flush-cleaning probably won’t do it much good and specialty shops are your best option for having one serviced.
In our research, we learned that ultrasonic cleaning is but one step in reworking an oil cooler. The folks at Pacific Oil Cooler in California told us that after ultrasonic cleaning, each cooler spends time on as many as three different flushing machines. High volumes of Stoddard solvent flushed at high pressure—with reversing direction of flow every 60 seconds—is the key to thoroughly flushing a cooler. The final flushing bench has a 10-micron filter screen that is carefully monitored until the cooler is clean. Coolers are run on each of three flushing benches in two-hour stints.
We suggest servicing the cooler once every three or four years, at the end of the engine’s TBO cycle, or any time any major engine work is being performed. Why invest in an engine overhaul (or major internal engine work) only to connect an oil cooler that’s contaminated with metal and sludge? Of course if there is obvious damage (to the cooling fins in particular), it needs to be addressed immediately.
FALSE READINGS
Unless you’ve invested in an engine monitor that has a known good oil temperature probe (installed correctly), you may not be getting an accurate read on the oil’s true temperature. There’s a simple and cheap test for measuring it. One way is to submerge the probe in a pan of hot light oil so you can accurately test the typical temperature range.
Probably the best sensor is a bead probe found in many relatively inexpensive multimeters with a temperature measurement function. This probe typically consists of a single Teflon-coated wire several feet long with a drop of silver solder or higher temp material at the probe end. A candy thermometer will work in a pinch, but you will find many good uses for a multimeter with a temperature function. Some temp probes go to 1500 degrees F or more.
Next, run the engine until the oil temp indicates between 180 and 200 degrees F. Shut down and cautiously touch (best to do with the bead probe) both ends of the oil cooler lines and all sides of the cooler. The temps should be the same as the sump.
A cold feed line (no oil to the cooler) means that the valve is not working or the system is blocked. A cold spot on the cooler means that you have an air bubble in the cooler.
Last, make sure the cowl flaps are opening and closing properly if equipped. The cooling you think they’re providing may actually be making things worse.
In a follow-up article we’ll dig deeper into more serious causes of oil temperature issues when these DIY basics aren’t the cure.


