by Paul Bertorelli and Sarah Sigmund
Inadequacy defined: stroll into a corporate hangar where the Gulfstreams live and compare that boundless flat plain of polished epoxy to the crummy oil-splotched concrete your Cessna or Bonanza calls home. Its enough to make a grown man whimper with that worst of jealousies, hangar-floor envy. (And lets not even think about mercury vapor lighting and forced air heating.)
While its true that many of us are lucky to even have a hangar let alone a polished palace of the sort the typical bizjet occupies, its just as true that a clean and orderly hangar-and especially a clean floor-elevates airplane ownership from mundane object possession to a spiritual experience.
Over the top? A little, but a treated concrete floor makes it easier to clean up the odd fuel and lube dripping or the environmental disaster that stalks the owner-performed oil and filter change.
This hangar floor thing is a good-news/bad-news situation. The good: you can have the gleaming floor of your dreams without spending obscene sums of money if youre willing to do the work yourself. The bad: if its done right, a proper paint job is a ton of messy, stinky work and it can be a logistical nightmare. Bottom line up top: it can be done; its not necessarily easy.
Why Do This?
Before we embarked upon the quest for the perfect hangar floor on the cheap, we thought the best reason for a shiny floor was for looks. While thats a nice dividend, there are other more practical reasons that hadnt occurred to us.
If sealed properly with paint, the hangar will be dryer-perhaps a lot dryer-and this has obvious maintenance implications. Further, the concrete will hold up better if it isn’t exposed to oil, fuel and maintenance solvents, but one of the bigger surprises is how much a good paint job brightens up an otherwise dreary hangar lighted by the typical single bulb or cheap fluorescent shop lights.
This makes it easier to find stuff you drop on the floor and even to locate things in the dark corner of the baggage compartment. Better to paint the floor than to curse the darkness. A properly painted floor is easier to sweep, another undeniable plus.
On the other hand, the two-part epoxy paints produce a polished, slick surface thats slippery when wet. In cold or wet climes, this can be a safety issue best dealt with by sweeping or squeegeeing the surface or adding grit to the paint to provide traction. (If you happen to own a TKS-equipped airplane, watch for excess fluid dribbling out of the membranes. On a smooth hangar floor, this stuff can be super slick.)
Our research revealed many paint systems-dozens, really-suitable for treating hangar floors and, indeed, some arent even paint at all. For the extraordinarily wealthy owner, there are poured-on surface applications similar to the terrazzo process, composite tiling-$15 a square foot and up-and even portable plastic floor treatments that you can take with you when the Dow recovers and you double the size of your hangar.
There are, in fact, so many paint products out there that were making no attempt here to review them all. We have simply selected three readily-available products and applied them to our own hangar floor with the notion of reporting on what theyre like to use and how we’ll they hold up to the ravages of a Florida winter. (Actually, summer may be the more rigorous test, given the oven-like temperatures in the hangar and periodic flooding rains that find their way under the door and through the eaves.)
People who carve their living out of making ordinary concrete shiny-yes, theyre out there-insist that if you do nothing else, don’t buy and apply ordinary, off-the-shelf concrete paint to your hangar floor. It might look alright for awhile, although even thats questionable, but its susceptible to the maximum sin of hangar floordom: hot-tire lifting.
When the airplane is rolled into the hangar after landing and taxiing, the tires will be warm to the touch, and were not talking about the molten patches of rubber remaining after your partner once again locked the wheels trying to make the first turn off, but the routine heat of normal operations. When the tire is parked on the paint, even this residual heat will lift the paint and when the airplane is rolled out, patches of paint will go with it. Or so we are told. We have our doubts that light aircraft tires get warm enough to lift anything but the weakest-adhering paint. On the other hand, thats what we aim to find out.
Well be doing tire lift tests in the coming months. In the meantime, we’ll take the experts word for it; if you want to avoid tire lifting, you’ll have to use paints formulated to resist it. In general, that means two-part epoxies or, at the very least, paints specifically formulated to perform similarly.
Griots Garage
For the Yuppie Scum who has everything and wants more, Griots Garage is a specialty catalog house that caters to guys who like to spend time in their garages. (Contact: www.griotsgarage.com.)
Hangars are garages so we bought enough of Griots two-part epoxy paint to treat a portion of our 1000-square-foot T-hangar floor. A word of warning: this stuff is the real deal. Its a heavy-duty industrial two-part epoxy floor paint that sells for $56.95 a gallon. For a typical T-hangar, plan on two coats, with each gallon covering about 100 to 130 square feet. Eight to 12 gallons may be required for the typical T-hangar so allowing for all the paraphernalia you’ll need, budget $800 to $1000 in materials. Buy a little more than you need because second coating has to occur within 24 hours of the first coat.
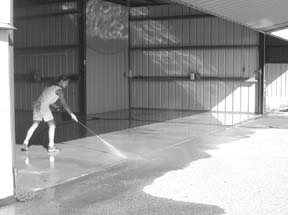
For our project, cleaning and etching the concrete with muriatic acid was the most difficult step because without water available to the hangar, we had to contact the local water department and airport authority to install a temporary hydrant meter and we had to rent a pressure washer to get the job done right. If this sounds involved, it was. Plan on two people for a half day just to prep the concrete.
Applying the paint is miserable work. Its as thick as honey and it only gets thicker as the epoxy begins to set. It rolls and brushes with effort but covers well. It will take two people four to six hours to apply one coat to a 1000-foot hangar. And we strongly recommend no fewer than two people to apply the paint, otherwise it will set up faster than you can apply it.
Results: largely as advertised, with a hard, glossy and nicely leveled surface that considerably brightens the hangar and covers most of the concretes blemishes. (Two colors are available, a light gray and a tan.)
Rust-Oleum Epoxy Shield
This is another two-part epoxy sold by Home Depot and by local paint stores. (Call 888-683-5667 for a source or refer to www.rustoleum.com.) Its available in a darker gray than the Griots product but is much easier to apply because it has the consistency of a typical enamel paint and appears to have longer working pot life.
According to the instructions, its a one coat product but were not sure we buy that. We thought it could have benefitted from a second coat. One thing we like about this product is that Rust-Oleum provides a powdered citric-acid based cleaner/etcher that you mix with water. This is friendlier than the nasty muriatic acid blend we used.