A couple of years ago, I invested a considerable sum in upgrading the panel of my 1980 Turbo-Saratoga and Id been thinking about upgrading the interior, too. The headliner and carpet had been replaced within the past few years but the upholstery and sidewalls were original and out of date.
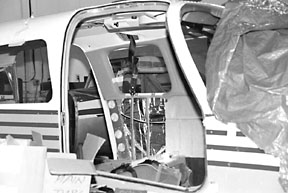
This is a dilemma faced by many owners. I didnt want to spend yet more money on the airplane, nor did I want it stranded in a shop for weeks getting an interior done. Fate intervened to present a solution. My airplane was the loser in an unexpected altercation with my hangar door and would be down for a couple of months for major repairs. While surveying the damage with my friend Keith LeBeau, I succumbed to his suggestion that a new interior could be a realistic do-it-yourself project. Although Id seen Airtex-type kit interiors with decent materials, the installations werent always the best. Keith suggested a middle ground: use the Airtex materials but get help from a local upholstery shop for the hard stuff.
Shop Around First
Before you embark on a DIY interior, shop the market. Its a lot of work to do this on your own and before you start, know what a professional job will cost and how its likely to turn out.
Upgrade options are numerous and confusing. My learning curve was enhanced by walking the exhibit area at AOPA Expo in Fort Lauderdale last fall. At one end of the scale are well-known shops whose complete renovations cost up to $20,000. The results are gorgeous, with leather interiors indistinguishable from new luxury cars. The seats are built up individually with the finest materials and can cost up to $2500 per seat.
At the other end of the spectrum are vendors of materials and pre-fabricated parts which can be installed by a shop or by the owner. The results depend upon who does the work and which materials are selected. Perfectly serviceable interiors may look great when compared with a run-of-the-ramp rental but theyre clearly not in the same league as the top-of-the-line shop-built renovations.
I wasnt willing to spend $20,000, but neither was I willing to accept an interior compromised by cheap materials and amateurish installation. Keith tricked me into ripping out the interior to get a feel for what would be involved and by the time I did this, I was on the hook to finish the job myself.
Further into the project, I discovered I could either send my old sidewalls out to be recovered or I could order brand new ones in the materials of my choice. Sidewalls are available for any model airplane in complete sets. For the Saratoga, there are seven pieces.
The scanty original seat-cushioning gave me back pain after trips as short as two hours and passengers are similarly unimpressed with stock Piper aircraft seats that arent even up to the comfort standards of a 1975 Chevy. I wasnt about to spend $2500 per seat but Id only accept aircraft-grade materials with the appropriate paperwork.
I decided to buy good materials and have my local auto upholstery shop do the rebuilds, something I don’t have the skill or time to learn. They had done a fine job of building new cushions for my J-3 Cub and I knew they were reliable and reasonable in cost.
The original plastic window moldings looked cheap, didnt insulate against noise or temperature and were discolored with age. They could either be painted or covered with cloth. Id need new welting-also called wind lace-that lines each door-opening and new door gaskets to deaden sound and defeat drafts. The armrests and other accessories were in need of upgrading, but the headliner and carpeting were acceptable.
Ordering Materials
For about $1600, I got a complete set of sidewalls made of pleated gray tweed cloth and gray vinyl from Airtex in Fallsington, Pennsylvania. These were heavily padded with foam for insulation against temperature and noise.
I asked them to add a couple of custom pockets for my various eyeglasses. Leather costs about $1000 more but the vinyl is almost identical and the color matches perfectly. I had planned on ordering matching gray cloth and covering the plastic moldings myself, but Airtex convinced me that the slight extra cost was worth having them do the work.
There’s some skill involved in spreading the glue correctly so that it doesnt soak the cloth or adhere unevenly. I packed the pieces in boxes and shipped them off.
From Airtex, I ordered welting, door gaskets and bags of interior screws and washers. They have everything you need and they know what you need. I ordered enough high-grade gray leather, cloth and foam to cover all six seats and armrests and had it shipped directly to Daves Auto Upholstery in Watertown, Connecticut.
Its easy to understand why our airplanes are noisy and drafty. The original Piper insulation in my airplane was scanty, inadequate, poorly distributed and wet or missing in many areas.
Over the years, some insulation is inevitably moved or lost during repairs so I ordered a roll of thick foam insulation, sticky on one side and foil backed on the other. The total cost of these supplies was about $2000. The nice thing about having a professional do your seats is that you can customize them. We used the seats in my Jeep Grand Cherokee as models and I told the shop exactly where I wanted lumbar supports and leg bolsters and how thick I wanted the seats and backs to be. The shop knew which certified materials to order.
We added several large elasticized pockets on the seatbacks and accessory pockets along the sides of both front seats to hold pencils, navigation plotters, markers and other pilot paraphernalia. The seats would be stripped to bare metal and built up with aircraft foam.
Work Starts
I received everything from Airtex, including the covered plastic moldings, within a week. The sidewalls were exactly as advertised, including the custom pockets. I was surprised and satisfied. There were absolutely no hassles or delays.
I removed all original insulation with a razor knife and rubber gloves, taking care to avoid damaging any wiring. I used the larger pieces of the old insulation as templates to cut new insulation. In some areas, the sticky back was helpful but in others it was a hindrance; I left the paper covering on so I could slide the pieces into place behind the steel tubing.
Wherever I couldnt place large single pieces of the new foam, I used several smaller pieces and I stuffed in handfuls of the old fiber material to seal various areas, including the unused middle vents. This stopped drafts and made the rear cabin warmer, something thats important in a turbocharged aircraft at any time of year.
By the time I was done, there wasnt so much as a square inch of uninsulated fuselage. I estimate the total additional weight added to the airplane is about 10 pounds.
The new sidewalls were we’ll made and look terrific. Instead of cardboard, the substrate is made of a tough, corrugated plastic material. These were thickly insulated with foam and covered with quality vinyl and pleated tweed.
The substrate is pre-cut for various wall-mounted appurtenances such as vents and armrest bolts. However, the foam, cloth and vinyl coverings are not pre-cut, which allows the owner/installer to cut out only the desired areas. For example, I don’t use the middle vents so I didnt cut those out.
The new sidewalls are significantly thicker than the originals, leading to some difficulties. The pilots sidewall is by far the most complicated, with a vent, static-air drains, ELT, seatbelt anchor, armrest bolts, and the master switch panel.
Advice: make the holes small and then enlarge them in position. Take care to precisely place these cutouts to avoid making a hole in the upholstery that cant be covered later. This requires twisting your body into the front corner, inverted, with a razor knife and a snip to nibble away to get just the right fit. No fun, especially for an aging baby boomer, but it can be done.
An awl or large pins-I used the stickers from the Thanksgiving turkey-to flag screw holes and other locations before cutting will help. Expect to spend a lot of time on this step, trimming, re-cutting and worrying things along. The moldings can be painted instead of covered, but the cloth adds quiet and warmth and lends a softer, more finished look to the interior. The extra cost is insignificant. The cloth also adds quite a bit of thickness to the thin moldings, which originally snapped into channels along the upper edge of the windows.
Once covered, they could no longer be snapped in, so I just installed the moldings right over the channels. The cloth also covers up the screw holes in the moldings so the awl is necessary to find the original holes for re-installation.
Details, Details
To install the wind lace or welting, remove the overlying thin aluminum strips that hold the welting in place. Hold the new welting in place and poke starter holes through the mounting flaps for the screws. Then replace the aluminum strip and continue; once the first couple of screws are in place, its easy to complete the job, using the drilled holes in the strip to find the screw holes.
The armrests can be difficult to install. Long screws affix them to flimsy plastic brackets in the walls of the airplane. Once the upholstered side-walls are in place, its difficult to find these brackets unless you have first marked the sidewalls with pins. Its dangerous to cut the holes first because they may end up in the wrong place. I punched holes in the newly covered armrests and forced the screws and screwdriver in. The thick tweed material simply closed up over the holes, rendering them invisible.
Tightening screws, making last minute adjustments, and installing the last few accessories such as vinyl-covered door-sills and door latches, has its frustrating moments. However, a project like this is a one-off custom job. By the time I got to this stage, I had learned to expect roadblocks and I knew how to overcome them. The finished product looks terrific, smells better and even feels great because I did it myself.
I have flown in factory-new airplanes only a few times and each was a thrill. But thats nothing to compare with the thrill of flying my own airplane reborn with my own blood, sweat, and tears. It smells new and fresh, looks great and its noticeably quiet and warmer.
Do It Again?
This is a tough question because Ill probably never face the possibility again. Renovating an airplane interior is in the same league as painting an entire airplane or rebuilding an engine. Most pilot-owners will face these complicated and expensive tasks only occasionally, if at all.
I cant say Id look forward to doing this again. But I am definitely pleased with the results and deem it worth my time and effort. If money is an issue, there’s no debate. I saved about $10,000. The entire job cost me $4500 and about 80 hours of work. For many, this fact alone will tip the balance in favor of an assisted DIY interior.
I enjoyed the solitude of working and the mastery of new tools and techniques. However, my absence sorely tried the patience of my wife and my office staff, so there’s a tradeoff. If you decide to replace your own interior, start with the attitude that you’ll be undertaking a big project with a finite and worthwhile goal. If youve never done anything like this before or if you are relatively inexperienced with tools, there will be frustrations. Take them in stride; I promise you’ll be proud of the results.
Also With This Article
Click here to view “Airtex Off-the-Shelf Kits.”
-by Brian Peck
Brian Peck is an internationally recognized rheumatologist and the author of “The Baby Boomer Body Book” published by Sourcebooks, Inc. and available from amazon.com.